You would… lolz
:gotme:
I know that Norb is the originator or 2 tone walls separated by a stripe so…
Hope to start my own soon.
just a dig on the multiple tone cars you have currently.
I will not apologize for them
wrapping up the heater install, i still need to chase down some trim collars for the vent pipe and finish trimming the outside with j-channel.
other than that I am trying to figure out why the heater won’t start up (power vent, blower fan, burners, etc) when I turn the power on. Thermostat is calling for heat, gas is on. It’s an intermittent spark type so no pilot - i don’t know if there is an easy way to test if the gas valve is working.
the heater will hum slightly when power is turned on, almost as if the blower motor is trying to run, but can’t. The fan spins freely but has some minor resistance, so I am assuming the bearings inside are fine. it’s a Dayton 4E455, 60k btu input natural gas.
in other news I placed my order for a MaxJax 2 post lift. Install won’t happen until this summer as I need to plan the layout and decide if I need to pour some new sections of concrete or not (current floor is pitched to a drain)
When are you going to install AC?
i can’t tell if you’re serious or not. believe it or not I actually rarely wrench on stuff during the summer…since the weather is nice I am always out and about enjoying the car and doing summery type things
Some recent pictures:
Had a buddy over to do some big service on his E39 M5. Another good friend with an M5 helped.


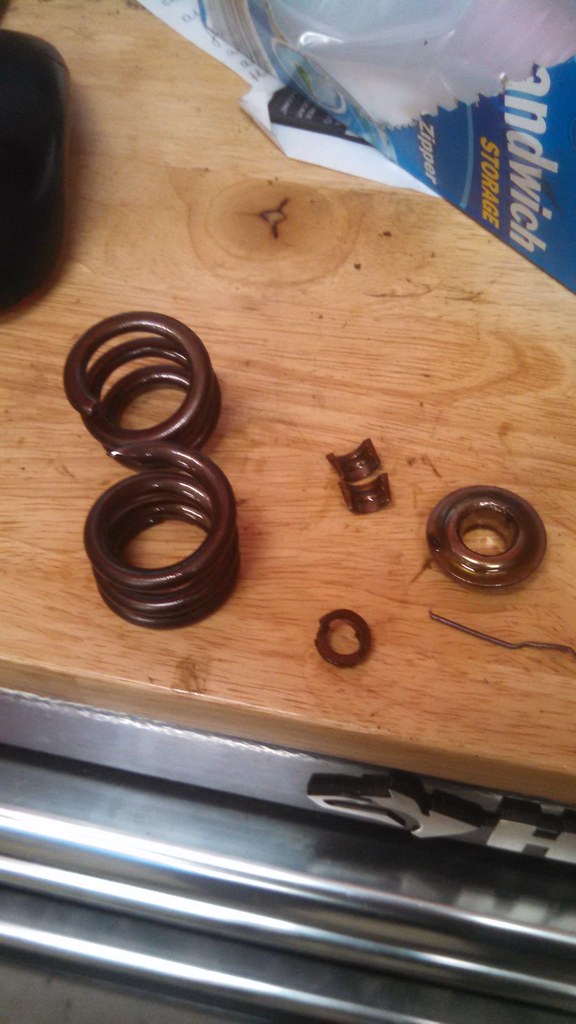
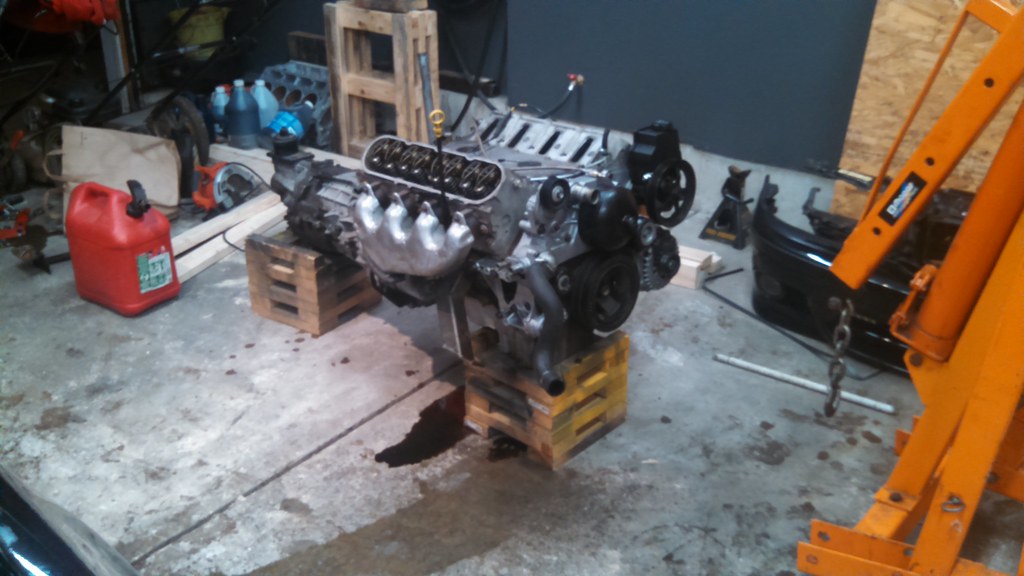
Had a catastrophic valvespring failure in my LS 560i.
 IMG_20150412_112537_907 by nogiba, on Flickr
 IMG_20150413_191344_548 by nogiba, on Flickr
It completely destroyed the block. The motor came out and wife helped me tear it down
 IMG_20150414_204610_208 by nogiba, on Flickr
 IMG_20150421_204532_836 by nogiba, on Flickr
 IMG_20150421_204459_780 by nogiba, on Flickr
 IMG_20150421_204401_246 by nogiba, on Flickr
-
-
- Updated - - -
-
Wife kept complaining that the hose reel was to close to her car door/parking spot so I moved it to the recessed portion of the wall. I should have done it that way the first time, but oh well.

Now some recent shots of the garage all cleaned up
 _DSC3666 by nogiba, on Flickr


my friend Technician117 on here gave me a hand and brought home a new toy
 IMG_20150424_164622_932 by nogiba, on Flickr
Posts in place - I still need to plan their width, spacing, and location fore/aft before I commit. Due to the slope of the floor I will be having new pads poured to support the columns. Still undecided on whether I’m doing one long width, or two smaller pads.

I rolled the daily into place for an idea of how columns will line up
 IMG_20150425_190930_898 by nogiba, on Flickr
I love the Audi and BMW theme!
-
-
- Updated - - -
-
You need a sign to show what BMW stands for. 
Dig two holes about 16 x 16 down about 12-14 inches. Drop 2-3 inches of stone. Tamp. Then pour 10-12 inches thick of concrete (two bags of cement and 4 bags of sand). If you plan on cementing in your anchors add some reinforcement to the pads when you pour. That way you won’t have to deal with drilling and possibly hitting your rods.
For all those that question; is this overkill…hell yes. You do know how much 1 versus 2 bags of cement, 2 versus 4 bags sand, and 0 versus 20 lbs of stone actually costs right? Spend the extra 15 dollars…
I don’t trust myself pouring concrete. Cutting it and digging holes, sure. But I have literally zero experience with pouring pads, so I don’t feel like having the learning curve bite me on this one.
I have an idea in mind of how i’d like to suspend the anchor rods, though
For everything you’ve done so far I think mixing and pouring concrete is the easiest thing lol, but then again. I have no experience with this either.
Pouring is seriously as easy as pouring. I can come out and help you if you want. You dont even need to mix it yourself, you can use this: http://www.homedepot.com/p/Quikrete-80-lb-High-Early-Strength-Concrete-Mix-100700/100318486?N=5yc1vZbogd
This will set up fast and strong. Since you have the lift you can make a template for the anchor bolts to be inserted at the right points. Mix it a little thick and they will stay right where you place them.
-
-
- Updated - - -
-
in commercial applications the footing would actually be 2" below the top surface and after the lift is bolted into place it would be grouted over the plate and bolts so that it was permanently attached to the floor i na fixed position, I doubt you want to go that far though.
What those guys said…I’d be happy to help you as well.
Just mix 2:1 sand to cement. Add water until it can be held upside down on a trowel…too much water add more sand/cement.
No real progress in the garage, kind of just been using it.
I did finally paint and hang the pegboard that I bought over a year ago, and hung some tools on it. Hooks are McMaster, they use 2 holes for support, and hold all that weight nicely. It looks nice, and frees up 2 drawers worth of space in the actual toolbox.
 image by Norbert Ogiba, on Flickr
Also, no picture on this, but I expanded a section of chalkboard-painted wall where I keep notes like oil changes for the cars, to-do lists, parts to order, etc.
Still mulling over how I want to install the lift…
Don’t. Just sell to me at a discount 
I need to get in touch with someone that does concrete, wasn’t there a thread on here? I also need to figure out if there is any drainage under the current slab so I can figure out where to cut.
@BOBBYGRV just had his driveway done. Guy did a great job and was recommending him to others.