Good thread, I’ll check back on this…
i think you guys missed that CO2 as drvnkid was saying is carbon dioxide lol. If you’re not getting a permit then the smoke don’t have to be hardwired.
carbon monoxide detectors have to be hardwired, as does anything in the basement i believe.
Haha good catch!
Yeah anything in the basement does need to be hard wired but that’s usually easy enough. I’ve also heard that CO and smokes in the basement can’t be wired with romex any longer. They have to be MC, BX, or piped. I haven’t actually done this myself yet, as the last new build I did had romex to the CO’s. It’s probably part of NEC 2011 that hasn’t been adopted yet. I’ll check later and post up.
just get those 3 prong to 2 prong adapters.lol
This is for drvnkd but I am placing it here so that others may benefit from it.
Rewiring a two story house:
Why are you rewiring? Is the wire old non grounded, do you need more power, just bored and feel like spending money? This is the first question that you should as k as it will determine the direction and scope of the project. For what I am about to lay out we are rewiring because we want more receptacles per room and because the existing wiring is old, ungrounded, and potentially unsafe.
Step 1:
Plan Plan Plan.
You need to fist look at your electrical panel, it must be breakers. If you have fuses then the scope of work necessary to complete this project is most likely now above what you are going to be doing without calling someone in. So you have breakers and that is great, now remove the cover and make sure that none of them are double tapped (two wires in the same breaker), that is a big no no. If there are double tapped breakers count them and subtract it from the number of open spaces in your panel. You will need several open spaces to complete the project successfully. I often recommend losing the panel and having a new one installed just so that it is all upgraded and you will be sure you have enough space to meet today’s code. I am going to ballpark that you need at least 4 open circuits as you will be eliminating old circuits and that will give you room to work as well.
The second plan that you need is the layout. I start in the basement and attic and hunt for a pathway that I can run several wires up. Near stairs or plumbing is often your best bet. Tie a fishing anchor to a string and drop it from the attic and try to hit the basement. This is often one of the hardest parts of the job. It is never easy to fish wires in older houses. Once you find or create your pathway to the basement you need to run several pull lines up so that you have a method of getting your wires up. Once you know the location your wires are going to land you can plan where you will run them to for distribution. I use a 4 11/16 square box in the attic per room and run the feed to it, then all drops out of it. Try to locate all of the boxes in a method that you can easily run a straight raceway to them.
Last step is planning out each room. You need to decide where you want each receptacle and switch to be. At this point you can add more, replace or remove existing and really get creative as to your needs and wants. Ceiling fans, or new lighting is always something to consider when you are making this big of an investment already. I added about $1000 of lighting and fans and would never even begin to consider it not worth it. Make sure that in your plans you meet code on placement outlets spaced no more then 12’ apart (but can be closer), and no point on the wall more then 6’ from a outlet.
Last step in planning is deciding how much wire you want to buy. I used all #12 in my house and went ahead and wired the receptacles and lighting on the same circuit in the bedrooms… There are not many large loads getting started from the receptacles like in a bathroom or kitchen. The recommended method is to use a lot more breakers / wire and to run lighting on 14ga 15A circuits and the receptacles on 12ga 20A circuits. This is not really a big deal for bedrooms but if you are concerned with the lights dimming when you turn on a vacuum then this is something to consider.
Now the last thing I will add here is that I always use 15A receptacles where allowable (not in kitchen or bath), they are rated electrically at 20A but the face plate is simply a 15A configuration and I would venture a guess that you have never seen or used a 20A plug so it is mostly unnecessary in residential applications.
Step 2:
Execute in an organized manner.
I am going to assume that you didn’t want to spend hundreds extra and went with all 12ga wire because that is what I did and I am sure if you made it this far in my write-up that you are smart enough to figure out how to substitute 14ga for some circuits.
So you have all of your wire and know how many circuits you will need, no go ahead and get it pulled up to the attic making sure to leave plenty of wire at the panel for hook up later. Once in the attic you can not just toss it up there and call it good. You need a race way. I build my own out of wood. A simple 2x6 with 1x2 or 2x2 side walls meets the requirements for cable protection. If requested I will provide a crude drawing. I build my raceway and wire at the same time so that I am not moving all over in a tight space. The simple explanation is to mount your square boxes to the race way and get the feed wire to them (I do not like to drill rafters and that is why I use the race way (you can drill the race way and it’s walls. Just make sure that whatever you do you meet or exceed this code:
E3702.2.1 Across structural members. Where run across the top of floor joists, or run within 7 feet (2134 mm) of floor or floor joists across the face of rafters or studding, in attics and roof spaces that are provided with access, the cable shall be protected by substantial guard strips that are at least as high as the cable. Where such spaces are not provided with access by permanent stairs or ladders, protection shall only be required within 6 feet (1829 mm) of the nearest edge of the attic entrance.
Once your feeders are to the junction boxes you can cut your holes in each room and start getting all of your drop lines feed to them. This is pretty easy as you can usually just drill a hole in the attic and push the wire down to the hole in the wall. Then just push your wire into the old work box and close up the hole. If I have to tell you how to connect a receptacle please go ahead and forget everything that you just read and call someone to do this project for you. Up in the attic once you have all of the wires pulled to the junction boxes you can tie them all together and go back down to do your hook up. As you are hooking up rooms you have effectively removed pieces of the old circuits. You can start checking and unhooking the old circuits as soon as they do not affect anything remaining. This will give you more spaces to keep working on your rewire.
Once you have the attic done and your entire upstairs done you can move to the comforts of the basement and start back at the planning steps to get power up to your first floor. (this is sometimes harder because you have to cut lots of holes to get into the ceiling fixtures). For the basement I like to run the wires along the perimeter and the main beams. You need to drill holes and structurally the best place to do it is close to the foundation or a support beam.
I am going to leave off here for now as this is a lot of reading, and I am more than happy to answer any questions that anyone may have. All I ask is that you don’t just take my word for things and your go ahead and REVIEW AND FOLLOW ALL BUILDING CODES. I AM NOT RESPONSIBLE IF YOU FAIL TO FOLLOW THE NEC AND BLOW YOUR SELF UP, NOR IF YOU DO FOLLOW THE NEC AND STILL BLOW YOUR SELF UP.
I hate my electrical.
All of the upstairs bedrooms have switched outlets for lamps. Only one ceiling light on the whole floor.
I also wish I had re-run the upstairs power before adding 20 inches of insulation.
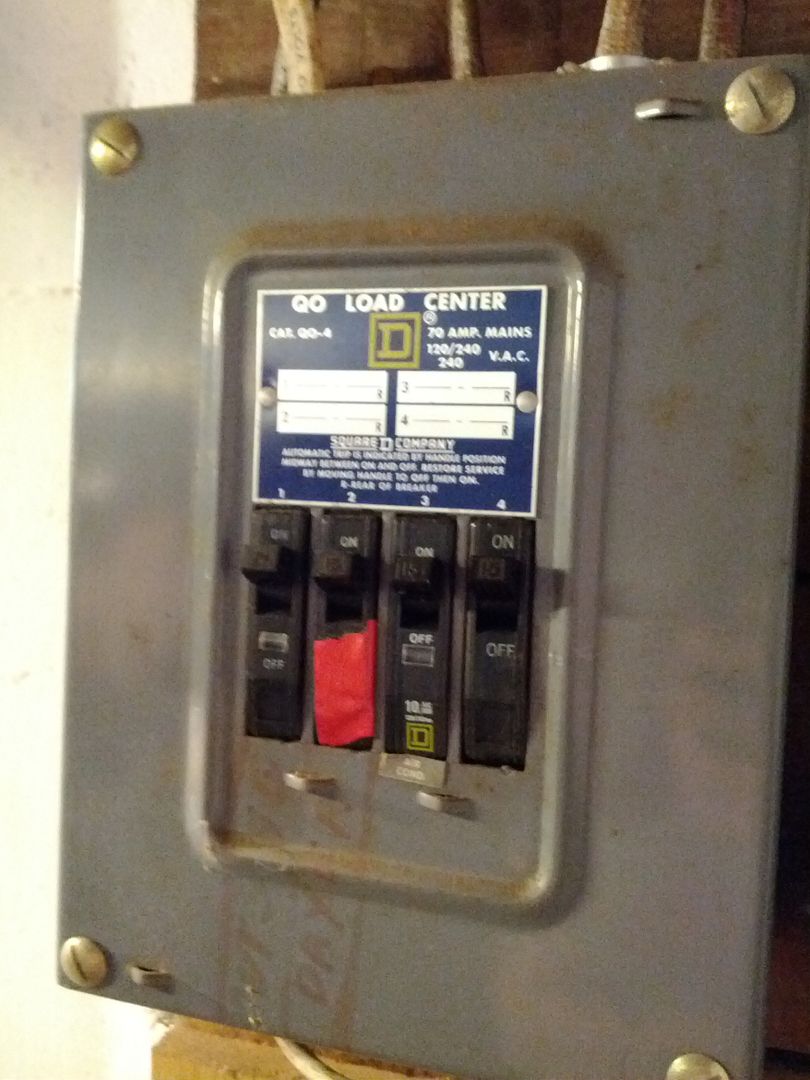
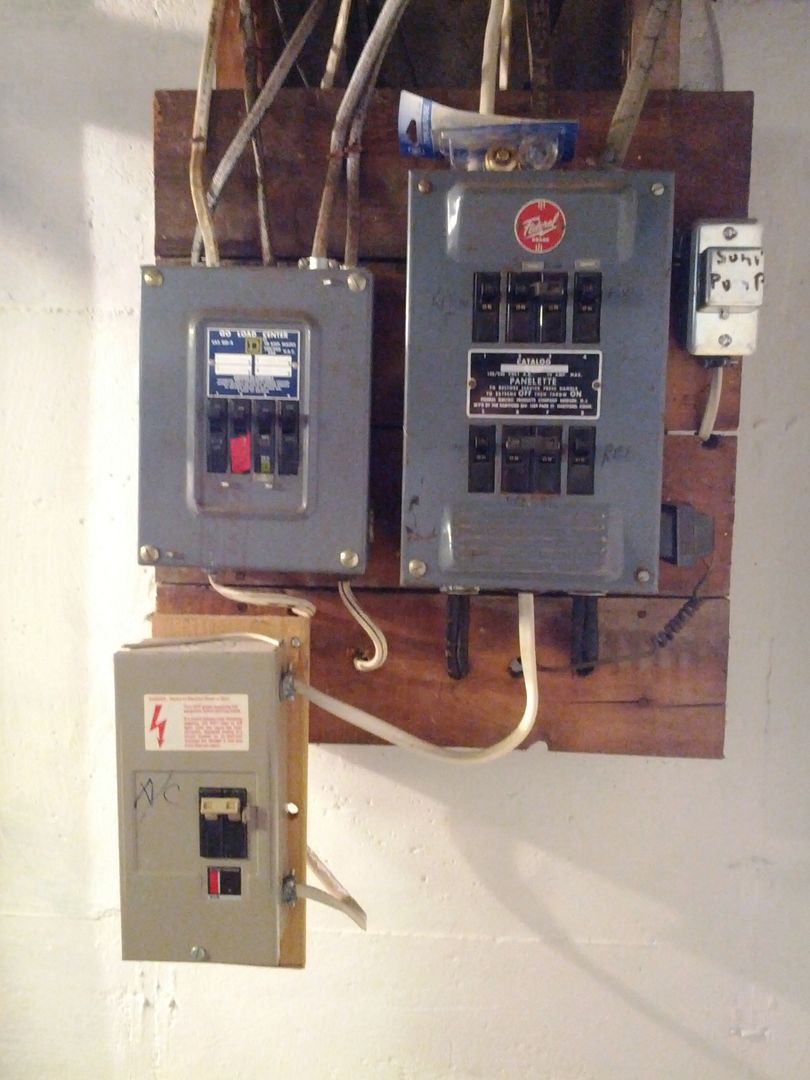
So right now there are three panels in the house I bought. One is dedicated to the A/C so I figure that one can stay. But would upgrading to something like this (http://bit.ly/HaEpyX) be a good thing to do? Or am I looking at the wrong thing?
Good info here…
[quote=“drvnkd,post:17,topic:221671"”]
Why would anyone put CO2 monitors in their holmes?
[/quote]
I think I drove past your house this past weekend. I visited Mr.Smith and your ride was parked on the street just a few houses down…I beeped at you ![]()
Yep. Thats my sweet house.
First that is a 3 phase panel and I am 100% sure that you need a 120/240single phase. Second, it is main lug which is used as a subfeed panel
Third, you have one main panel and two subfeed panels, not a big issue but not the best way to do things. Take a look at your main panel, is the breaker 100A? If it is 100A then you can not just upgrade to 200A without an entire service upgrade (approx $1200 depending on meter location, panel location and number of circuits). If it is 200A then sure go ahead and rip the smaller panels off and consolidate them into one longer Main Breaker panel.
I agree with this with one caveat: Personally, I like to have a dedicated sub-panel for the garage (in the garage obviously).
^+1
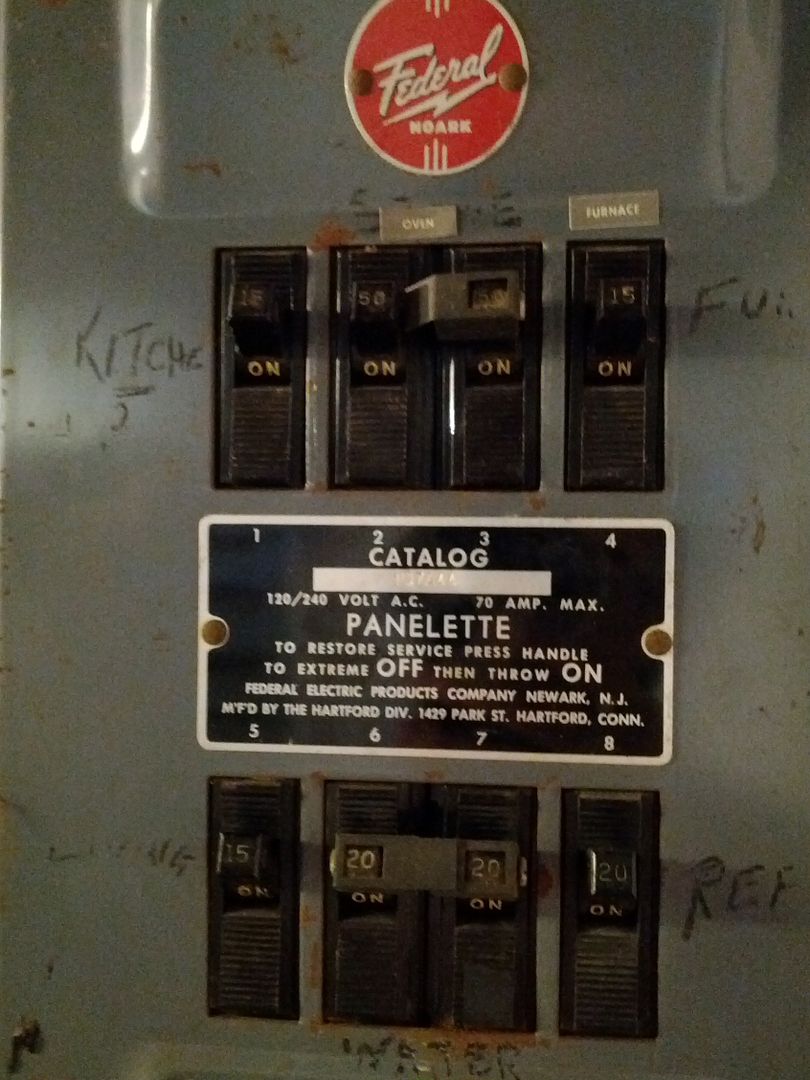
What kind of panels are they??
If you have federal pacific, you’ll want to upgrade the panel definitely. Anything else is probably fine and replacing them is probably just wasted money.
Not sure, I’ll let you know in May hopefully. Should know monday actually…Pictures to follow.
If they are federal pacific they HAVE to be replaced. You may not even be able to get insurance with them being in your house. (if they actually check the house out) (and if it burns down and you have a FP box, good luck)
You do 200 amp services for $1200? Shit ill just sub my side jobs out to you!
Yeah wtf! Undercutting!
We had a fed pac panel that we were trying to find a circuit. We intentionally shorted the circuit and the breaker would not trip. The buzzing lead us to the right panel at least!
Fucking junk!
That was the quote I got out here in SLC; new wires from the transformer to the house (Owner/electrician supplies those out here in UT); new Panel/Meter Socket (They’re 1 unit here in UT); and install. (Including the permits and coordinating with the Power Company; ~6 hour job due to the inspections/power-company having to do the meter.
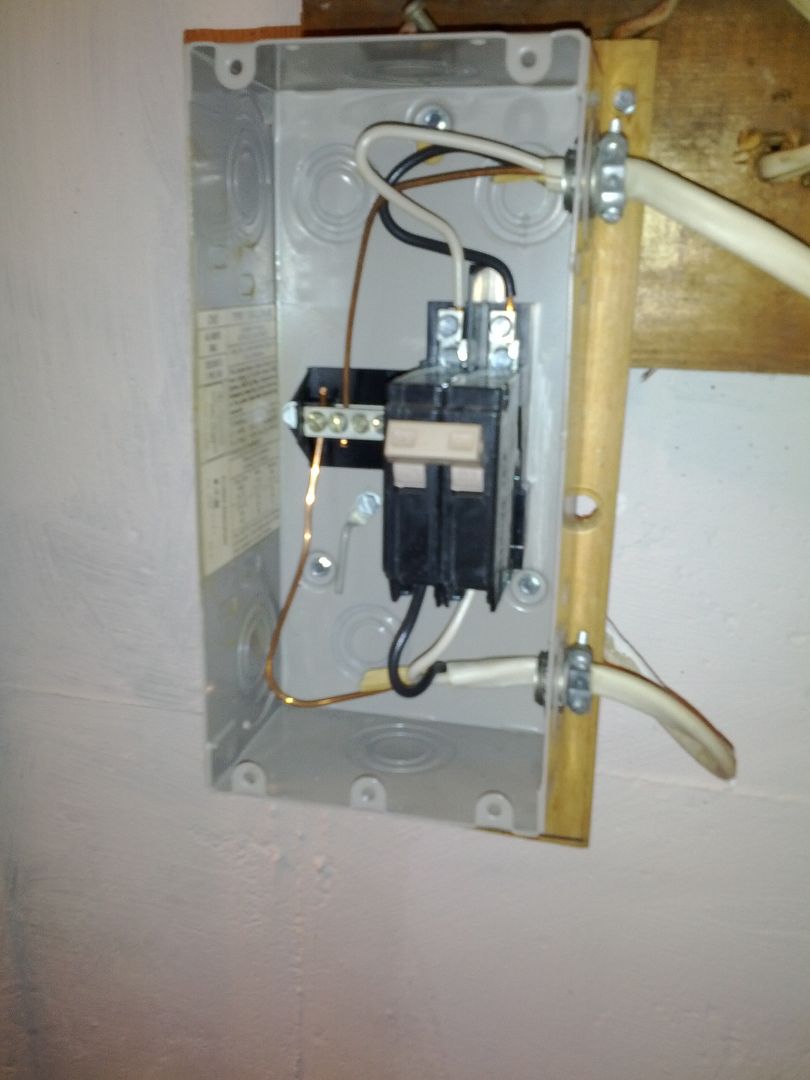
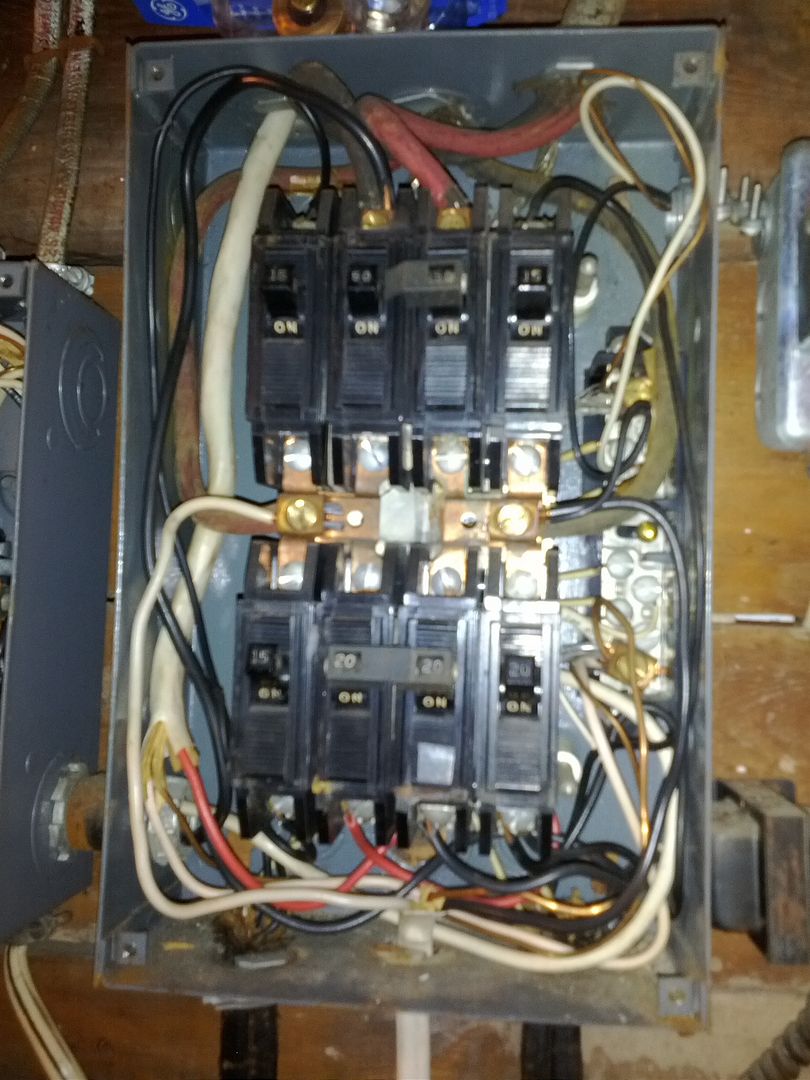
Alright electrical nerds, here’s the panel. Home Inspection was today (Which went great btw). The main power coming into the house was frayed, so that needs replacing. Also the box in the basement is wired like a fuck and is in a Federal box  . Rough Estimate was $1500 to replace the whole main feed and switch out the panels into one new panel. This came from the Home Inspector, who stated he’s not an electrician but that would be his best bet. He was impressed with my Federal box knowledge, so thanks for the background on that. He explained the boxes are wired wrong, there is no main disconnect, etc. Some outlets in the house ARE grounded, some are “grounded” (grounded receptacles no ground wire), the rest are two prong. The bathroom has a GFCI in it that was tested and DOES work properly. Here are the main panel(s) pics. Forgot to snap the outside wiring that was frayed.


Good news is, we can use this to try and get the seller to pony up and pay for it. Mainly cause it won’t fly with FHA, so selling will be tricky.
That’s actually not bad at all(comparatively) we had the service replaced when I bought my house because the main service line was frayed, and they had a commercial 3 phase breaker box that the previous owner had jumpered in order to make it work… It was ~$1100 for that(8 years ago).