Fiberglassing project: Suggestions wanted

Well I got some free S14 sideskirts from Franknut. Thanks again DUDE!!!

They are origin aggressive which fit the look of my car better and the only company that makes a sideskirt this aggresive for my car is BN Sports and they cost $369 before shipping. I like free with some work better.

#1 the side skirts need to be cut and extended almost 2"
#2 This area needs to be cut out for door clearance after test fitting again
#3 this area may or may not have to have some fiberglass added or extended to but up to the door in the front. I’ll know once i can test fit better
#4 the tops may need to be shortened to follow the body lines of the car better

Now I’m looking for advice on how to go about this. I generally make a little template out of cardboard or styrofoam like a mold and the attach that to the piece and lay fiberglass blanket of the and brush on resin. I figured this would work for extending the skirts. Then just sand down and add some fine filler. Thats how i filled the hole on my rear lip.

Is there an easier way?

I use the 3m stuff you can get at autosone resin and then blanket. Is there better easier to work with stuff?

Is there a way to do this to cut down my sanding time as the 3m resin tends to like puff yp and take forever to sand even with a power sander?

“Aero,” not body kitz.

Me thinky you’re going to do all this work and then shatter them into a million little fibers on a cone next season.

Lol I am reinforcing all my shit and building crash bars. My car will destory the road before the road destroys my aero

:bs

Got this from Ziptied:

OK here it comes.

Allot of what drift girl said is good advise. Ill just highlight it and add a few more.

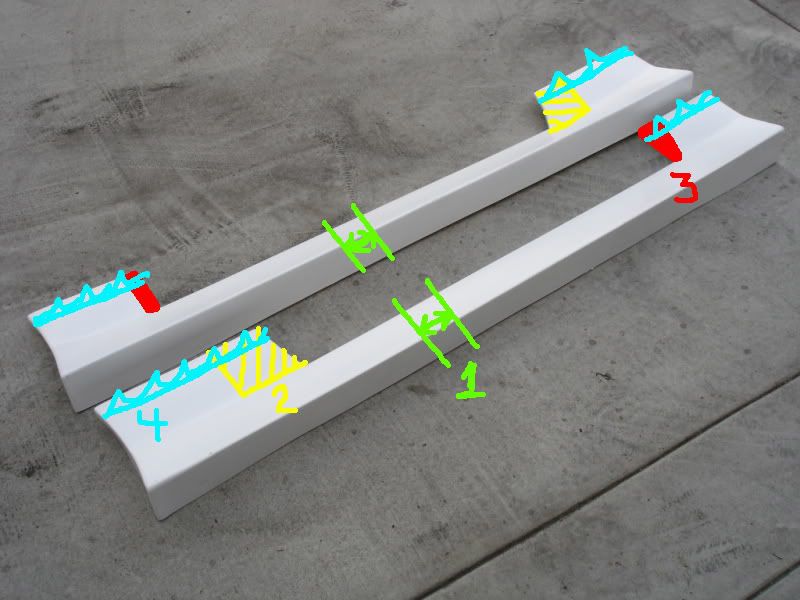
using 80 # grind away any fraid and jaged peices. also bevel the outside the part you see, down into the crack. Then be carefull and take away as much of the gell coat as you can with out going into the peice.

now on the back side grind it flat, All the jaged peices and the back side of the peices you need to creat adheision to the part hardend resin allone wont hold the patch.

now line up all your shit on a bench or what ever. If its the lower lip or something yes lay some wax paper down on a board and then set your bumper on it. If you have busted out peices that fit in where the bumper makes contact to the waxpaper lay them in.

HINT. this is going to get hot. from the chemical reaction so you might want to use some screws and hold that badboy in place. You dont need to go threw your part but allong the edge with fat headed screws just to keep things lined up.

There are many resins. cheep shit is probobly what they used in the first place so dont worry about blowing your wad on good resin. Average boat repair resin will do just fine.

Cut some strips out of mat some that are long like bandaids and some that will cover the area. I like to follow with some fine cloth so a peice or two of that if ya got it.

Using a 2 inch wide paint brush, brush on your mixed resin (FOLLOW THE DIRECTIONS IF ITS COLD OUT THROW A FEW EXTRA DROPS IN) paint the peice like your painting a house. Then lay your strips on. go oppisite of the crack with them like if the crack runs up and down run them left and right. If you have tight curves this is the place to but the strips togeather so you can make the radiuses.

Now brush on some more resin. while your doing this if you donot have a roller I take the brush and dab the resin into the mat to push out the air pockets. You need to get them out or your not building a stong repair.

After the strips are on and well coated and the air bubbles are out throw on your full sized patch. do the same with the aplication. If you have the cloth then throw one layer of that on and just dab it to soak up the execce.

This should dry in like a 45 mins to an hour if your impoatiant like me give it some heat with a heat lamp.

OK shits dried what to do next.

Get your 80# grinder back out you will notice that the fiberglass filled allot of the front so you need to grind it smooth. If you got hangies and sharpeis on the back side give it a polish with the grinder as well.

NOW to the front.

using (TIGER HAIR, KITTIE HAIR, LONG AND STRONG, FIBER THREE, CARBON FIBER PUTTY, OR WHAT EVER ELSE THEY HAVE) mix it up with its catalist and spread it on like bondo. This shit should kick fast like 20 to 30 mins. Then sand it with 36# cause its nasty hard. this should fill and make your surface real close to the pannles original shape. You will have pin holes. you might even have hard edges but this will fill with the

BONDO. yup finish it with that and do as you would any other bondo repair.

Dont wory about regell coating it. gell coat is not important in a repair. use a two part epoxy or 2 part primer to fill and sand it for paint.

Look in the spray can thread for painting instructions.

REMEMBER to grind further than you will be laying the epoxy and mat. dont get stupid with the grinder just remember to put a scratch into it to hold the new stuff. You can paint your resin out to there when your doing the rest and it will help bond it all into a rigid peice again

Yessssssss.

I hate saying body kit. it just sounds sooooo trashy.

even though my shit isnt aerodynamically designed its still aero to me.

Ron,

PM me and we can talk about the best way to do this. I used to do a lot of fiberglass work with car audio and there are a few ways to go about it depending on what type of resources you have and how your tolerance for aggrivation is.

:slight_smile:

i could do it, glass work is pretty damn simple. all body work is for the most part, just time consuming.

Forget this thread, srs bzns just stick to what your good at, posting CP pics

Hahahaha

I made my extension mold last night

How is this project coming? Which method did you end up using?

I’m waiting on a new battery charge for my dremel to ship. Seemed my other shorted out or something. Won’t charge the battery.

A friend of mine on the drift circuit suggested also using tape and yardsticks to sort of create o mold on the side skirt. I’m going to play around with things once my battery charger arrives

Pics of progress or ban.

I will post some up when i get more done. Right now I just have a mold made its nothing special

word of caution, Ron. When theyre on, the passengers are going to step right on those getting out of the car. Just so you know when it will happen a bazillion times. Dont bother telling them more than three times NOT to step on it getting out, they will anyway.

Yeah. that shit happens now. I was thinking of putting razor blades along the bottom edge. Once some one cuts themselves a few times they wont do it again

make em take shoes off. im THIS close to making people put on little cloth booties and white gloves when theyre in my own car. i always get these greasy paw prints all over the car and dirty foot prints on it whenever ppl get in. i have NO CLUE how it happens. they look pretty clean gettin in the car and after they leave its liek a re-re was eating hot wings in there.

Update:

Here you can see the Vertex style sideskirt off my car at the top and the Origin S14 sideskirt below

This is how short the s14 skirt is compared to the vertex skirt.

Test fitting the s14 skirt on the car with the correct amount of extension

Now since the test fit I have done some more thinking. The tops of the s14 skirts will need extensive modification as you can see in the picture. My idea that is what if i cut the top of the side skirts clean off at the seam and the grafted the flare onto the existing vertex skirts. I could rivit the two bottoms of the skirts together and then fiber glass along the seam where the flare would meet the vertex sideskirt which would basically be right at the door sill. I think this would require less work and actually create a stronger sturdier sideskirt