My weekend full of blood, sweat, and a LOT of cursing

I decided to finally finish up the front mount this past weekend and what was supposed to be just a simple mod finish turned into an entire weekend full of lots of little mods. In the end I am happy with how everything turned out. I know that some of the mods will not be liked by all and I have no problem with that… but I am happy with it and thats all that really matters… lol. Here they are in no particular order:

  1. Washer fluid reservoir “reassignment”: In order for the FMIC piping to fit properly (without looking like it was just thrown in without a care in the world), I had to either relocate the battery or turn it 90*. I opted to turn it so I didn’t have to worry about any relocation issues. Well in order to turn the battery I had to get rid of the small add-on washer fluid bottle and reassign the washer fluid reservoir. Since the factory IC sprayer tank was no longer useful without the TMIC, I decided to use that since it already had a good size pump attached, its a nice large tank, and its completely out of the way. I started by re-routing the rubber line from the TMIC sprayer location and connecting it to the washer sprayers instead. I then re-routed the rubber hose so it didn’t just flop around in the breeze when the hood was open.
    http://i51.photobucket.com/albums/f367/offroadzj/2004%20Subaru%20STI/STi002.jpg
    http://i51.photobucket.com/albums/f367/offroadzj/2004%20Subaru%20STI/STi003.jpg

I’m going to keep an eye out for chaffing with it just tucked under the fender like it is, but I think it will be ok. I rewired the factory washer sprayer switch to activate the IC sprayer pump. I still have to find a way to bypass the timer module for the IC sprayer (one button press latches for 5 seconds of spray; not a big deal, but something I will fix later on)

  1. With the washer fluid bottle out of the way I was able to get to work on the battery. I completely cleared out the front corner of everything that was there and cleaned it all up (tucked any harnesses, etc). I drilled 2 small holes in the lower battery hold plate to accept the “J” hooks for the battery hold down. I also had to make a 60* bent in one of the “J” hooks to be able to fit around the battery. I re-ran the factory chassis ground to a lower bolt that is a little less visible. I also had to extend the starter wire and the engine ground so I replaced both of them with 1/0 AWG for the starter and 4awg for the ground.
    New chassis grounding point:
    http://i51.photobucket.com/albums/f367/offroadzj/2004%20Subaru%20STI/STi022.jpg

Battery installed and rotated:
http://i51.photobucket.com/albums/f367/offroadzj/2004%20Subaru%20STI/STi024.jpg

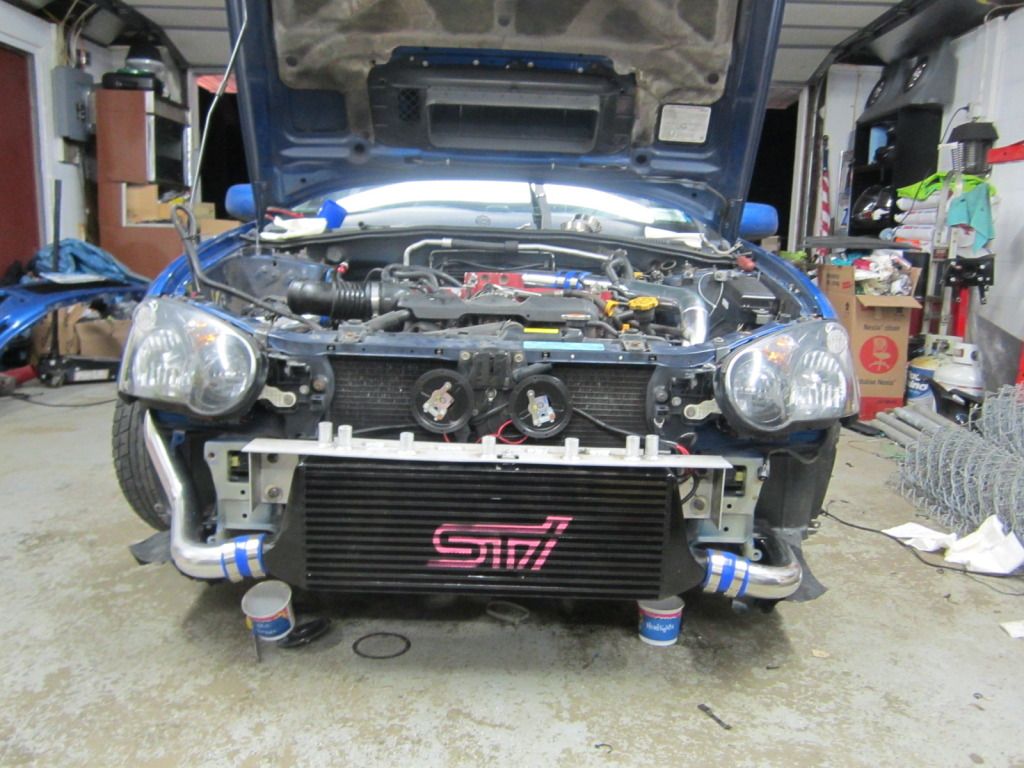
Clearance to piping:
http://i51.photobucket.com/albums/f367/offroadzj/2004%20Subaru%20STI/STi026.jpg

New starter wire and engine ground:
http://i51.photobucket.com/albums/f367/offroadzj/2004%20Subaru%20STI/STi021.jpg

  1. One of the brackets that holds the O2 sensor plug and a few others was sticking out quite a bit more than it needed to so I popped the bracket off, cut off about 1" and re-welded the bracket back together. Not a big deal, but it pulls it in a little tighter to the strut tower.
    http://i51.photobucket.com/albums/f367/offroadzj/2004%20Subaru%20STI/STi009.jpg
    http://i51.photobucket.com/albums/f367/offroadzj/2004%20Subaru%20STI/STi010.jpg

  2. Upon trying to get my trunk open Saturday, the cable decided that it was going to freeze up on me. Well since I had the camera in the key slot (no key to open it) and the sub box blocked the access to the trunk for the safety release, I ended up having to work through the rear deck-lid and release the trunk. I had to walk away from it before I ended up breaking it (I was getting pretty livid at that point) so Drew got it open for me. Since I didn’t feel like going through all that again, I decided to take the camera out and put my key cylinder back in. Well I found the key cylinder, but couldn’t find the linkage rod that it uses so it was off to lowes to buy some metal rod. Made a few bends and got it to work.
    http://i51.photobucket.com/albums/f367/offroadzj/2004%20Subaru%20STI/STi030.jpg

  3. I didn’t want an atmosphere venting BOV so I had Brooks weld my HKS BOV flange so that I could re-use my pre-existing recirc. silicone hose. It wasn’t quite the right angle, but it worked fine. Also drilled the underside of the piping for the water/meth injection.
    http://i51.photobucket.com/albums/f367/offroadzj/2004%20Subaru%20STI/STi020.jpg

  4. During the entire time I was under the hood, the cable from the alternator to the battery was bugging the hell out of me. for whatever reason, Subaru decided to just lay the wire on top of everything where it stuck out like a sore thumb. So I disconnected the mounts, pulled it back to the battery, and re-routed it so it sits behind the bracket and looks much better. I will keep an eye on it to be sure there won’t be any heat issues from the intake manifold, but it should be ok.
    http://i51.photobucket.com/albums/f367/offroadzj/2004%20Subaru%20STI/STi015.jpg
    http://i51.photobucket.com/albums/f367/offroadzj/2004%20Subaru%20STI/STi017.jpg

  5. Another item that was bugging me was the upper coolant reservoir. Since my STi has the FP Green oil only cooled turbo, the coolant reservoir had already been capped off in most places. So I decided to remove the reservoir completely. I capped off the engine block exit hose (I referred to the cooling schematic before capping anything off. This was just an additional flow exit for cooling the turbo). I also put an easy vent on the radiator where I removed one of the lines. This will allow me to let air escape the radiator when filling with coolant.
    http://i51.photobucket.com/albums/f367/offroadzj/2004%20Subaru%20STI/STi019.jpg
    Apparently I don’t have a picture of the coolant reservoir removed, but it opens things up quite a bit and looks a lot cleaner.

  6. I added an AEM Tru-boost system so that once it is tuned properly, I can keep the boost turned down for everyday driving (save gas and wear & tear on the engine). Then if I want to turn it back up, I can do so easily.
    I made a quick little bracket and mounted the solenoid on the passenger strut tower.
    http://i51.photobucket.com/albums/f367/offroadzj/2004%20Subaru%20STI/STi040.jpg

  7. Well with the addition of the AEM UEGO, AEM Tru-boost, my existing Aquamist fail-safe / flow gauge, and soon to add Oil pressure, Oil temperature, and most likely fuel pressure, I needed a place to put the gauges. I did not like the clock pods and to me the a-pillars just never quite match right. So I did some brainstorming and came up with what I think is a great solution… so i got into it and started fiber-glassing. Its not done yet because I want to run it like it is for a bit to make sure I am going to like it before I spend the time and money to finish it up. But so far it is working great. Everything is very easy and quick to see without having to turn my head. And even though it may look like it obstructs the view, even the highest gauge only sits just slightly above the factory hood scoop… so I personally don’t notice any loss of road vision. I tried taking a picture from my perspective, but I’m not sure if it still really gives a good idea of it or not.
    http://i51.photobucket.com/albums/f367/offroadzj/2004%20Subaru%20STI/STi042.jpg

The back of it directly follows the factory dash lines. So once it is finished and vinyled, it should look almost factory.
http://i51.photobucket.com/albums/f367/offroadzj/2004%20Subaru%20STI/STi037.jpg

  1. While wiring up the gauges I decided to make my life a lot easier when it came to adding additional gauges, or quickly disconnecting a gauge if I needed to. So I picked up a couple terminal blocks, attached them to a piece of plastic, wired them up, and mounted it behind the factory cluster. It works great for quickly connecting the gauges and has power, ground, and illumination (dimmer).
    http://i51.photobucket.com/albums/f367/offroadzj/2004%20Subaru%20STI/STi032.jpg
    http://i51.photobucket.com/albums/f367/offroadzj/2004%20Subaru%20STI/STi033.jpg

  2. I tucked the Labonte controller and Aquamist control box also behind the factory cluster to keep everything together.
    http://i51.photobucket.com/albums/f367/offroadzj/2004%20Subaru%20STI/STi039.jpg

  3. And finally, I was able to complete the FMIC install. I also finally got around to painting and remounting my hella horns to center them a little better in the grill.


    http://i51.photobucket.com/albums/f367/offroadzj/2004%20Subaru%20STI/STi013.jpg
    http://i51.photobucket.com/albums/f367/offroadzj/2004%20Subaru%20STI/STi028.jpg

Yea, it was a long weekend but I am very happy with the results. It came out great and it seems to pull quite a bit harder. I do still have to get it re-tuned but it actually went the opposite way than I thought… it seems to be running richer with the FMIC… where I though it would run lean due to the added air flow. Either way, a re-tune is coming soon.

Nice work! The only thing that bugs me is the STi on the intercooler looks add centered.

it is a little off-center. I did it at night so I could barely see it. Its an easy fix though. At first I wasn’t even sure if I would like it or not. It is an exact replica of the factory stencil on the factory TMIC (except its pink instead of red)

Well after day 1 of testing (not a full day, just to / from work) here is what I’ve found so far:

  1. Pep Boys “silicone” vac lines SUCK. I blew off my BOV / boost reference line twice even with zip-ties. It has since been replaced with a 3/16" fuel line and seems to be a much tighter fit.

  2. CEL came on for P0172 Bank 1 System too rich, which I was pretty much expecting since I don’t have it tuned for the FMIC yet and I knew it was running rich (thanks to the AEM UEGO)

  3. When fully warmed up, it seems like it wants to idle very low when I first start it up or if I come to a stop w/out downshifting. It hasn’t actually stalled out yet, but it has gotten pretty close. Its not a hunting idle either though… its very smooth, just very low. Then it will equal itself out after a second or 2 and idle smooth and normal. Not sure what might be causing this… I can’t find any vac leaks and I am showing between 16 and 20 in.hg. vac at idle which seems to be right.

  4. I tried playing with the AEM Tru-boost and switched to my “B” boost which is set at only 10psi… but I was still showing up to around 22psi boost… which makes me a little worried about my “A” boost setting. I haven’t really gotten on it heavy to see what my peak boost is, but I’d like to figure out what is going with the boost controller. I am pretty sure I have it connected correctly. It is a little tough to determine the barb connections. The one on the very top is pretty obvious, but the side port seems like its still in the upper cap even though my AEM instructions say it should be in the lower section of the EWG. Here is a picture of the EWG and the instructions. I have the top port of the EWG going to port 2 of my AEM solenoid, then the “lower” port on the EWG and the turbo pressure line come together and go to port 1 of the solenoid. Port 3 is vented.
    http://i51.photobucket.com/albums/f367/offroadzj/2004%20Subaru%20STI/048.jpg
    http://i51.photobucket.com/albums/f367/offroadzj/2004%20Subaru%20STI/049.jpg

I love driving home and seeing your garage door open and either your sti is up in the air or drews truck is haha looks great!

Or his VW is in there… almost every night has at least 1 car in that garage… lol. The only down side is that it keeps getting shit added to it and I never have time to clean it. Its due for a hefty cleaning in the near future. Way too much crap cluttering up.

dude. seriously?

Uh. You drunk?

I knew there would be some who didnt approve, but what about it bothers you so much? The factory tmic was very restrictive for the boost it was running. Yea it worked and was tuned fine but why choke the engine?? My guess is your hatred is geared more towards the gauge cluster and possibly the stencil on the core. The stencil was more of a trial yo see if i liked it… it is an exact replica of the factory stencil on the tmic. As for the pod, i personally like to see what is going on in my engine so i can jopefully catch a problem before it becomes a bigger issue. And I was not a fan of any of the pod solutions out there so i decided to make my own.

Engine bay needs a bath! And just curious as to why you choose pink?

Yea my guess would be the cluster pod I’m not a pillar pod person did u ever consider the 3 dash pods that I’ve seen other sti run? That’s what I’m working on for my Volvo maybe you could give me a hand with the fiberglass end of it as I have no idea what I’m doing in that department … And yea there’s always a car in there haha I liked the pink wheels he had on that thing

Because real men rock the pink :wink:

I agree that the pod is a little rough… but hopefully when its finished it will flow a little better. If not, then its nothing but time wasted (and a little $$ for the resin / hardener) since nothing on the dash has been changed (no holes, etc). In the meantime, I may try to find something different. One thing I’ve been throwing around, but I’m not really sure if making my own clock pod that will house 5 or 6 gauges… but I’m not really sure how that would work out.

looking good bro!!

I did a quick check on the visibility issue. While stopped at a light, normal distance from the car in front of me, I can still clearly see almost their entire rear bumper… so there can’t be that much visibility lost. If I drop the seat to its lowest setting then it starts to become obtrusive, but I normally keep my seat almost all the way up (I’m a short guy and its better on my shitty knees and back).

I got some news today as to why my AFR was so off the wall (mostly running very rich). Apparently when the car was last tuned, the MAF had been scaled for the APS 70mm intake… so running that crap short ram that came with the IC piping kit was just throwing it for a complete loop. As soon as I got home from work I popped the front bumper off and started looking at ways to re-route the piping so that I would have a plan for getting it welded. Well after some thinking, some trial and error, followed by 2 cuts and 1 extra silicone coupler; the pipe was re-routed to allow the APS intake to fit back on. It still isn’t perfect so I will eventually have it welded to make it a little nicer but if works great for now. The only issue I have with it is that the intake “pipe” and the IC pipe are touching and will probably rattle. The IC pipe is also a little tight to the power steering reservoir, but its nothing that should cause any issues. And the best part… the AFR returned to almost the exact levels as with the top mount… no more pig rich!!! I am still going to have it tuned because the AFR isn’t as ‘stable’ as I’d like to see, but its plenty safe for easy to moderate driving (even though I still have to keep out of boost because of the over-boosting anyways). Thanks guys for the help! Now hopefully I can fix the over-boost issue, get it tuned and start enjoying it again!
http://i51.photobucket.com/albums/f367/offroadzj/2004%20Subaru%20STI/002-6.jpg
http://i51.photobucket.com/albums/f367/offroadzj/2004%20Subaru%20STI/003-2.jpg

biggest. coney-est. filter. ever.

True story. But its what was on there… at least its a k&n…lol

Well I’m pretty sure I found the culprit for the overboosting. Pulled the wastegate off after work today and found that only 1 of the 2 unused reference ports appears to have lost its plug. It seems like there was a plug in it at some point but it must have decided to take a leave of absence.

Can someone just verify for me quick so that I am 100% sure that it needs to be plugged. I’m pretty sure it does since without it being plugged the boost reference is just venting and not actuating the wastegate fully.

Thanks in advance.
http://i51.photobucket.com/albums/f367/offroadzj/2004%20Subaru%20STI/562163_10150989992155786_528115785_12838429_488714647_n.jpg

Of course this is a HUGE kick in the balls. All that blood, sweat, cursing, and the massive headache (not even including the money) was all pretty much wasted and a simple $.50 plug would have fixed it… DOH. Oh well, live and learn.

Plug that and use loctite 5770 or similar on the plug threads