DIY: Taking a stab at CONCRETE COUNTERTOPS

[FONT=Times New Roman]inspired by the endless potential creativity of working with concrete i decided to go out on a bit of a limb and try making some countertops for my kitchen.

The biggest aesthetic concerns are thickness, color, surface finish, decorative touches, etc. The biggest practical concerns are weight, handling, durability, and longevity.

This art of using concrete for a counter is surprisingly unknown to the majority of the people I try conveying my project to. Most are trying to hold back a look of discontent as they imagine a hunk of sidewalk in your kitchen. Far from it. The versatility of concrete enables you to do anything, only limited by your creativity… and sometimes pocket book or level of DIY competency.

http://www.mytorontohomeimprovement.com/wp-content/uploads/2009/01/concrete-countertops.jpg

http://static.concretenetwork.com/photo-gallery/images/400x400Max/concrete-countertops_2/concrete-countertops-counters-counter-tops-pourfolio-custom-concrete_5520.jpg

At any rate… my existing kitchen layout is below. I’ve been using my old countertop as a temporary until this project is completed. Overall I will have the same basic shape, but with plans of adding a breakfast bar, a little bit of an overhang, and some functional/decorative features:

http://sphotos.ak.fbcdn.net/hphotos-ak-snc6/hs012.snc6/166242_1511068067938_1571464210_31132909_7081180_n.jpg

I began by taking measurements of the existing cabinets, made decisions on how much overhange (I chose 3/4in overhangs) then imported them into CAD:

http://sphotos.ak.fbcdn.net/hphotos-ak-ash1/hs745.ash1/163743_1527879288208_1571464210_31156554_7366718_n.jpg
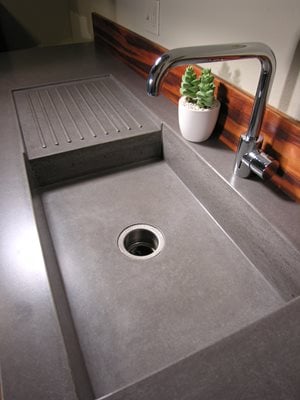
From there, I drew the location on the sink, a recessed trim around the sink to catch water as well as be aesthetic. I added a trivet, which is what you set hot pots on to cool while you work around the stove.

http://sphotos.ak.fbcdn.net/hphotos-ak-snc6/hs046.snc6/167604_1527828726944_1571464210_31156472_7949087_n.jpg
http://sphotos.ak.fbcdn.net/hphotos-ak-snc4/hs1380.snc4/163232_1527828926949_1571464210_31156474_4782838_n.jpg

FORMING: these will be cast upside down at a remote location. So the surface that I pour onto will be the top surface of the countertop.

Knowing how I wanted the final look of the counter to be, I had to begin planning for the formwork. Due to the size of the slabs and deciding to make the seam at the center of the sink, I was going to need 5’x8’ sheets to cast them.

Planning around using 5’x8’ sheets of melamine (actually 61”x97”) I plotted out the form work. I thought it would be easiest for me to do the layout if I cut little troughs to lay my formwork into…so I know everything is perfect with minimal work to do the layout.
So what better then to CNC?

The thought here was to remove only 1/8" of material to set my side forms in. In addition to making the layout a breeze, it’ll help lock the side forms into place so they don’t bow out or deform with adding the concrete.

Is it overkill? absolutely yes…but i can.

the “trivet”:

http://sphotos.ak.fbcdn.net/hphotos-ak-ash2/hs009.ash2/33816_1527886768395_1571464210_31156562_4841559_n.jpg

http://sphotos.ak.fbcdn.net/hphotos-ak-ash1/hs736.ash1/162984_1527884008326_1571464210_31156559_4772665_n.jpg

http://sphotos.ak.fbcdn.net/hphotos-ak-snc4/hs1355.snc4/162713_1527884208331_1571464210_31156560_6137044_n.jpg

I’ve got 2 differet sheets that were CNC’d. Just to illustrate the layout here are some of the form walls in place.

http://sphotos.ak.fbcdn.net/hphotos-ak-ash1/hs749.ash1/164001_1527884528339_1571464210_31156561_3202910_n.jpg

This is it for now… hoping to have all the prep work, rebar, and all the form work completed tomorrow morning to do the pour work in the afternoon.[/FONT]

Looking forward to the final product.
I have seen some really nice concrete kitchens but they were all professional. I am sure yours will be as nice or better based on previous results.

what is your est weight compared to granite?

Cant wait to see it.

:tup: These are becoming more and more popular. I considered it for my kitchen, but it just seems a little more complicated than having Corian or the like dropped in.

concrete is about 140lbs/cu-ft, granite is about 165lbs/cu-ft

at about 2" thick, the 3 pcs will be: 454lbs, 285lbs, and 68lbs

I’ve helped my uncle make some concrete countertops before and the results were awesome.

Yes!!! Cannot wait to see your end result, I know it will look fantastic. I have a great book at home about constructing concrete counters as once upon a time I had intentions of doing this to my house I forget the name but I’m guessing you’ve got a strong handle on where you’re headed from a design and construction standpoint.

Where is the CNC? What a great tool to have for a project like this.
And it looks like you’re working in Rhino???

Really cool. And honestly it seems like once you do it, it’ll be really easy to repeat with consistent results. In for the final product. :tup:

Having seen your other threads, I have 100% faith that this will turn out awesome :tup:

:tup:

Can’t wait to see this unfold.

I’ve been wanting to try this for a long time. I’m thinking about doing a bathroom vanity top to see how it goes… Just need to complete finishing work on other projects before I can get the go ahead from the wifey.

Question: How do you plan to make the form for the sink hole, or are you going to cut that out after the slab is poured?

Also, what concrete are you getting to do this?

From my research, you’re definitely doing this the right way pouring it into the melamine board.

Suggestion: If you want rounded corners, put a bead of caulk between the bottom of the melamine sheet and the side supports :slight_smile:

Im definitely interested in seeing more progress! Should be interesting maneuvering a 454 lb couter into your kitchen.

I love your posts, seriously. I cannot wait to see how this looks when it’s all done!

:tup:

it’s a buddies CNC. Yeah, i designed it in Rhino because it was easier to import the file for CNC programming.

I CNC’d a foam plug out of pink foam board, same for the faucet rough openings. FYI, The caulk is a must on the inside corners, otherwise the moisture in the concrete will make the board expand over the 4-5 day cure period…deforming the mold. If you plan on polishing the concrete (as i do) you can round the corners then.

each “batch” of concrete will be 80# bag of 5000psi Concrete, 50# bag of Quick Setting Concrete, 8# of portland cement, and plastasizer so i don’t need to use much water. The more water i use, the more likely cracks are to develope.

what’s also nice about CNCing the form…is i can easily lay down the masking tape at the edges beforehand without fussing with my gap. The masking tape prevents the silicon from getting all over the place.

3 guys, no problem.

grunt when you lift, so everyone can see how jacked and tan you are.

I’m not gonna quote the whole thing, but great info. Thanks. You’re lucky to have a CNC for all of this lol. I’ll have to use basic hand/power tools.

I’m really interested in the polishing phase, although when/if I do mine I plan to keep it looking a little rough since I like the Rustic look.

What about a type of dye’d and stamped concrete?

:tup: in for finished results.

I’ve had a lot of thoughts on this topic. I’ve definitely thought that it would be cool to do some aggregates, like adding rocks and broken glass in near the top. I’ll definitely explore some dyes. You can do some really wacky shit with the dye, it’s badass. I’ve seen some concrete countertops online that blow me away. I’ve also been to a lot of bars that have concrete countertops.