yeah I was thinking I would rather get to know the process first (and inexpensively in the case that it ends in disaster) before getting fancy with it.
At one time, I did a lot of reading on this, and it was pretty clear that if you intend to get fancy and/or order a lot of fancy material, it can get costly real quick.
When mine were done they made a custom template at the house. If you are using a CAD drawing and CNC router you better A) Hope your house/cabinets is perfectly square or B) Buy a lot of caulk. lol
Either way I am sure it will be sweet when done. :tup:
I checked it and over the course of 10ft…it was out by a light 1/8". My backsplash is 3/8" thick so it will overlap any voids or wavyness to the walls. I had already planned on the possibility of the walls not being square before going the CNC route and made exact wooden templates that were going to be used for mold forming.
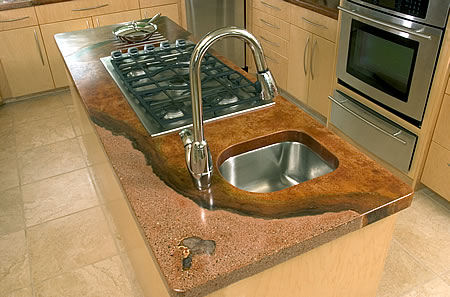
poured the concrete yesterday, they need 4-5 days to cure before being pulled from the mold. From there i need to grind polish and fill any air pockets (if i choose to). Tenetively i plan on transporting them home and installing them the following weekend, or about 2 weeks after being poured.
the stainless trivet in place. I welded little anchors for a better embeddment into the concrete:
for the rounded edge, i used a piece of 1/4" plexi and slid into the CNC’d groove. Used some “L” brackets to prevent deflection:
For the inside corner radius’ i used a piece of PVC pipe and cut to fit a 90° corner
masked off all the inside corners for silicon:
ran a bead then spread it with my finger:
pulled the masking. This will prevent water/moisture from getting into the wood causing it to swell and screw up my molds:
added the sink cutouts. Extended the recess to use as a water catch. Also i cut some foam plugs to use for the rough openings for the faucet:
covered the foam with packaging tape:
started laying the rebar:
stay 2" away from all edges:
supported all the rebar, trying to keep it a min. of 3/4" away from the top surface. Any closer and “ghosting” could occur and you’ll see it in the face of the countertop. I also added some decrotive stone which will be visible when i polish:
Also made a little “overflow box” mold so i could practice my mold removal and polsihing on a sacraficial piece.
everything set and ready for pour:
I poured the concrete yesterday but have no pictures because it was all very timely and needed my full attention. But i will post some of them setting up later.
Besides my hands being sore as hell…everything went fairly smoothly.