I remember when some guys wanted this done for the july meet hahah… i say socko will be done by november
Got some bushings installed. Hoping to have it rolling soon so I can move it to a clean spot to paint it.


I tried to get some “silver” rust paint. Apparently I grabbed “Aluminium”


New fender came in today. Fits better than the other, but still needs some adjustment.

wow…nice tension rods. howd you get em out and…in?
Burned the old bushing out with a torch. Then, I heated the nut on the outside of the brace and took it off.
After, I heated the living hell out of the other end of the bolt and the “sleeve” where the bolt slides in. Then, I locked a pair of vice grips on the “sleeve” and put the handle in the vice (As not to bend the brace). I then whacked the shit out of the open end of the bolt and also used a socket to sort of “twist” the bolt out.
I then took torches and cut out the old metal sleeve from the old bushing that remained in the rod. After I cooled the rod, I lubed up the inside of it and slid the new bushing in with the help of a rubber mallet and a flat piece of steel.
The two outside pieces just slid in there easy as pie. Finally, I lubed up the center sleeve and pushed it through the bushing by hand. A couple taps with the rubber mallet at the end ensured an good fit.
Took about 30minutes from start to finish (first time) and about 20 the second.
In an attempt to get the wheels on the car and getting it rolling around, today is pure suspension work.
Rear multi-link getting some bushings.

My sweet ass bushing press system.


Three more in the hub.

The mutli-link ready to go back in (Toe arms had to be replaced - one was bent) and tension rods for the front.

So you just painted over the rust?
lol it’s tremclad rust paint
tremclad doesnt hold that long
the only way is to sand blast then paint
I just wire brushed for now. At the end of the year, it’ll all be Bing’s rear mutli-link setup anyways. 8)
Also, got the lower control arm and the sprindle apart for the rear. Nissan claims that the rear balljoints are unreplaceable, however, there is information that says B13 Sentra front balljoints will work.
I’m going to test this out. The ball joints are clearly replaceable as they are held in with snap rings. Hopefully I can put some pictures up that will solve this once and for all.
hey sock, keep up the good work buddy
for future reference instead of making a contraption to press in the new bushings, cut them in half and they slip right in… some kits come with them pre-cut, some done. just cut them in half with a sharp razor (dont use a saw or you’ll lose some material) the cleaner the cut the better though, put it in a vice and it will be easy.
also, Moog makes a rear balljoint for s13
No, they don’t. :lol:
Burned out the old bushings.
Old rear balljoint vs. 1993 Nissan Sentra (B13) front balljoint
Apparently the control arm sleeve is supposed to come out like this.
In the real world, they came out like this.
Getting ready to drain the diff. I fear the worst due to the previous ownership.
Jesus! It’s still clean-ish!
A little mettalic material on the drain plug.
Clean is a subjective word.
Quick spray from some Simple Green grease killer.
Subframe time.
Pressing in new balljoint.
Ready to roll.
All the links in place.
Rear spindle in place.
Mounted coilover.
All done for today.
Today’s update is very improtant: it’s about knife safety (and one hand typing).
While I was trimming the remainder of an old bushing out, the knife slipped and decided to cut the fuck out of my hand. Really, I did about 15minutes work and then the hit.

The next two might be NWS
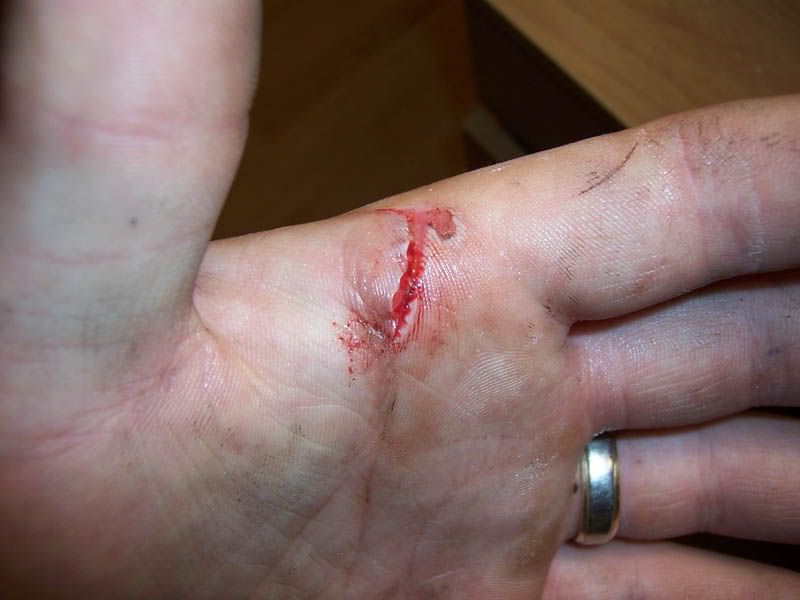
My hand just after the cut.
NWShttp://img.photobucket.com/albums/v374/sockington/240sx/aug25/02.jpg
After wrapping it for a short time.
NWShttp://img.photobucket.com/albums/v374/sockington/240sx/aug25/03.jpg
So yeah, it is definetly a bleeder.
I then wrapped my hand in more clean toilet paper and drove my ass home one handed. This is quite difficult to steer, signal, shift and apply pressure to bleeding hand with only one hand - it was quite the performance.
When I got home, I dumped alcohol on it (fuck that hurt more than the cut), wrapped it in gauze and surgical tape.
Not sure if my hand will be good by Monday to continue the work. Shit.
awesome cut!
meh, all part of the “restoration experience”, seen worse, many a time, even on myself
LOL. I love how your medical skills are just as gangsta as your fabriction efforts on the rust-o project! Maybe you should post a second thread on the healing process of your hand…
…I mean that in the most complimentary way possible ![]()
Hey, it’ll keep it clean until I can get a chance to run into the hospital (gotta work at PartSource tonight).
learning so much on the suspension/bushing part, not like its hard, but yeah.
my fav thread!
thanks socko
After I cleaned it up, it’s not as bad as I thought.
Stitches?
Nope.
The glove I was wearing during the accident.
With my little home-made protective bandage, it makes it look like I have a tumor on my hand while wearing latex gloves.
I was installing the balljoint on the passenger side rear control arm when I accidently snapped the vice. Crap.
Seeing as I couldn’t really do anymore suspension work for the day, I determined I might as well work on fitting the passenger side fender. I needed to clearance the three top mounting holes as they didn’t line up properly.
Jesus, it’s starting to look like a car again.
I only put about an hour and half into it today since I have to work tonight, but definetly progress can be made in my condition. I want to get the body back together so I can prep for paint.