Not sure what to do yet about the passenger door handle because the lock does not work with the key for the car. The previous owner swapped the handle out and must not have swapped the lock, why? IDK, he was an idiot.
I wouldn’t know where to even pick up one, dealer I guess.
Good news for me, I hooked up my laptop with the ecmlink cable I found on the floor and was able to connect to the ECU and V3 is installed and the ecu is in place.
Visited http://dsmlink.com/ for some info on how get rolling on speed density.
Saw that I already had a MAP sensor installed. So more good news as that makes the conversion that much easier.
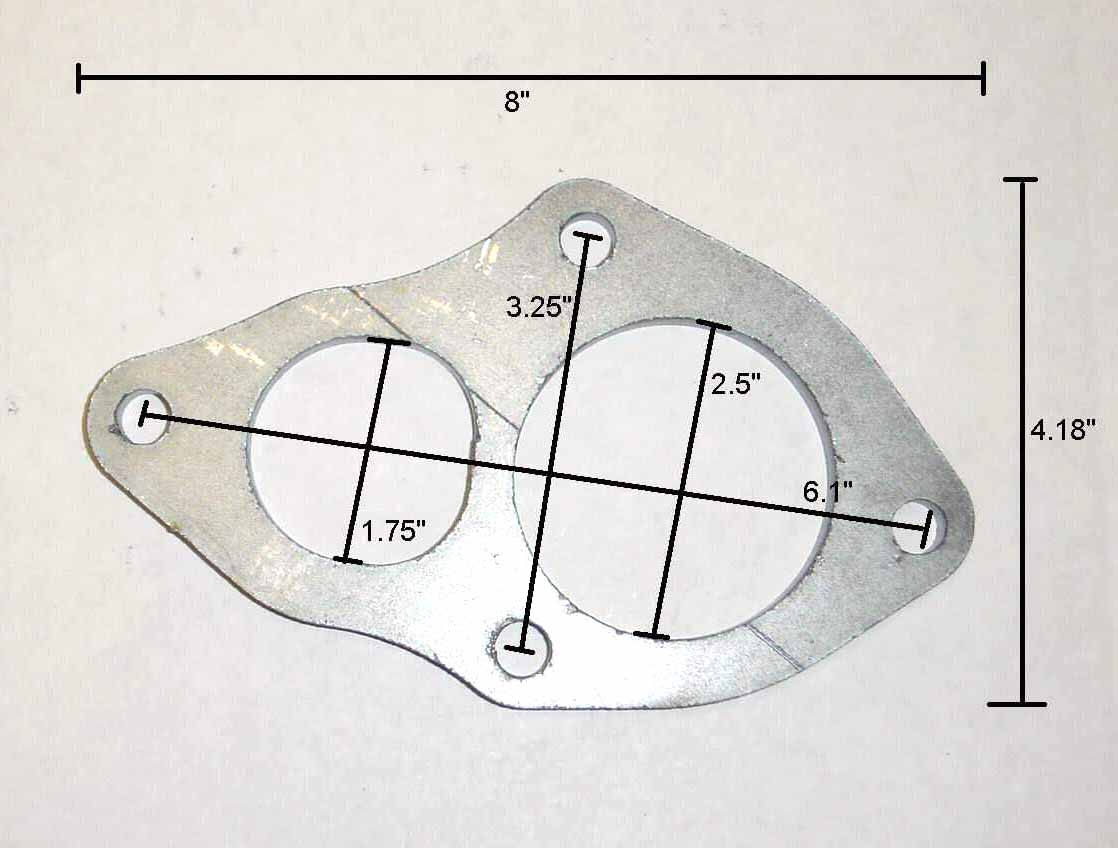
I just need to connect the IAT, picture marked the one with tape, the other wire is black.
You must connect your IAT sensor to the ECU’s IAT input. This is the only input that’s compatible with the speed density logic inside the ECU.
You’ll want to use pin 72 (red w/blue stripe) on a 2G ECU harness. The other wire should be connected to the ECU’s sensor ground. That would be pin 92 (black) on a 2G ECU harness
The IAT sensor has two wires coming out of it. Either wire can be connected to the ECU’s IAT input.
So I must have been prepping … and then forgetting about what I had, as I had two extra 3 bar map sensors and 1 extra IAT sensor.
Thanks guys for the words of encouragement, it helps me want to update this build thread on this forum. Its fun getting non-DSM peoples opinions and thoughts on my car.
Spliced in the GM IAT, used heat shrink over the solder & electrical tape.
Put the IAT in place out of the way, there was some type of red goo on the threads so I didn’t use any Teflon tape. eventually I’ll get a BLT in there.
With all the sensors in place I went into ecmlink and chose the inputs, I know that I could have done screenshots but I was holding my camera, I went off of memory for the wideband and map sensor. If its not right I’ll trace the wiring back to where it got spiced in.
Make sure you save the pin assignments or they won’t be there the next time.
So now I had to fill the gap left by the GM maf and translator.
Luckily I had a long section of coupler stashed away that fit exactly.
I took a peak at the speed density maps and realized that I don’t know anything about this type of “cell” tuning.
I gave it a jump, and for the 1st time since nov/dec 2010 my talon ran. I let it idle for about 1 minute then it kind of puttered out and died. I didn’t restart it. I need another battery, but no way am I shelling out the cash for a redtop again until this car is done.
A lot I want to do, but I need to learn v3 and I kind of just want to drive it as is until winter. Still have a lot to do before I can even think of putting this in the road.
Quote:
The problem with deeply discharged optima type batteries is that most battery chargers can not recognize the battery is present when the voltage is less than 4 and thus doesn’t go into the charging mode.
When an optima battery won’t charge by ordinary means, simply connect a second, well-charged battery (12.4 volts or better) in parallel with the dead unit - positive to positive, negative to negative. Then connect the charger to the pair. This will in effect trick the charger into delivering the necessary current to the discharged battery. Using this method, we brought several deep-discharged batteries back to life.
The threshold for recognizing a battery varies from charger to charger, so we generally suggest charging the deeply-discharged battery above 10.5 volts before disconnecting the healthy battery. Since the batteries are wired in parallel, it doesn’t make a difference how they are connected, although it might be easier to wire the deeply-discharged battery in the middle. That way, when it does reach an appropriate voltage level, you can just disconnect the healthy battery and continue charging the deeply-discharged battery.
The key to long battery life (regardless of brand), is to make sure your battery is always maintained with at least 12.4 volts, whenever possible. When batteries are discharged below that level, sulfation begins to diminish both performance and lifespan. That makes a battery tender or maintainer an excellent investment for any vehicle that is not driven daily.
Most alternators are designed to maintain batteries, not recharge deeply-discharged batteries. If a battery is discharged to the point where it needs a jump, we recommend fully recharging the battery with a battery charger as soon as possible. Relying on an alternator to recharge a deeply-discharged battery can lead to a cycle of dead batteries and jump-starts, until either the battery or alternator fails. We do not recommend using high-amp units, as they can “cook” a battery. For regular charging, we recommend a maximum of 10 amps at 13.8 to 15 volts.
If you have any questions about our batteries, please don’t hesitate to ask.
Jim McIlvaine
eCare Manager, OPTIMA Batteries, Inc. OPTIMA Batteries
Today I decided to do more tweaking with ecmlink to see if I was really understanding the ecmlink demo videos I have been watching. I let the car idle for about 40 minutes while I made my changes.
If I did things right… all it took was about 120ms of dead time adjustment and I had my LTFT Lo within 1%.
I’ve used jump boxes a ton of times to save batteries and at least get the charger going… you can pull it off a monitor charging voltage with a meter after a little while.
I was not sure what to do. At first I thought about just getting the car on the road for summer. But there was a small oil leak from the oil filter housing, so that rules out any trips to the track until that is fixed.
The rust needs addressed, I forgot where most of the wires go or where I spliced what into where. Also need to get a battery box for the battery location. Just a good bit I want to do yet to the car. So I’m thinking I just tear into it and get the car where I want it. That will mean another year of being down but… What is the alternative? Maybe it won’t be so bad and I’ll be looking at spring 2014.
Just picked up two 100% rust free DSM doors. Some guy brought them up from the south.
These are not from a 97 talon like I need, I know that for sure. They do have the dsm tag so it should just be a matter of drilling and/or filling holes for the trim locations. Using this quote as reference.
IROCavenger
:
Also for future reference all 95 - 99 Eclipse & Talon doors will interchange. with the only difference being the holes drilled for the side spears on 97 & 98 Talons, and lower holes drilled for the 95-99 GS GST GSX & 95 96 TSi TSi AWD door skirt caps. as mentioned above.
You have manual windows and power windows. Also the doors off 95 - 2000 AVENGERS will fit but you will need to change the door glass and mirrors. Avengers 95 & 96 the body door edge guard moldings are stick on and can be peeled off easily, on 97-2K the door edge guard side moulding are plastic riveted on and when removed will need to fill the holes.
The interior trim panels will all inter change with power windows. All Manual trim panels will fit manuals.
95-99 Eclipse Base & RS has no side molding nor side skirts
95-96 Eclipse GS GST GSX has side skirts with door caps 1st design
97-99 Eclipse GS GST GSX has side skirts with door caps 2nd design
97 & 98 Base Talons had NO door spears or side skirts.
97 & 98 Talons had door spears on ESi TSi TSi AWD and no lower side skirts.
95 & 96 Talons had no door spears or door guard moldings or skirts
95 & 96 Talon TSi TSi AWD had lower twisty door caps with side skirts.
Also they are set up for manual windows and mine are auto so I’ll need to be switching EVERYTHING over.
The fan is SO loud. Everything seemed to be in working order.
And here it is a couple hours later.
What spurred this was that I Found that the 1st gen Slowboy racing cast manifold had broken while on the car in three places and decided it was time to start mocking up the HX35.
Also never use ARP stainless steel turbo bolts in a cast turbine housing. They WILL seize and break.
Shane (spoolin69) from dsmtalk made it for me, it was a custom part and now I need it to complete my turbo build. Its a flange and gasket that bolt to the turbine housing allowing me to make the o2 to downpipe section of the exhaust.
I’m ready to move forward and can’t find it. Getting nervous.
After unboxing the awesome S.S. flange & gasket I went to work on getting the turbo on this car.
I got lucky and found my Turbonetics cast t3 manifold. Got it cleaned up by tapping the threads, put anti-seize in the holes…
Then realized I don’t have any bolts to mount the turbine housing to the manifold. Without this I can’t really set the height to mock up the oil drain line or the o2 housing. That would be if I could find the whole 02 housing I used to have. I spent all of Saturday and part of Sunday looking for it. Wherever it is I bet its right next to the original spoolin’ flange. I don’t know where this stuff walked off to.
So right now this is where I’m at until I can locate more of my stuff.
Right now I’m trying to decide between 2ga Talon side skirts, and 2gb eclipse side skirts.
Sorry this image is so small, I wish I was sent a better picture.
or
I’m looking @ $255 for the twisties and $300 for the eclipse. So I think its may just come down to which ever has the most intact mounts and who can salvage the most hardware.
I’ve always said keep talon parts on the talon. So I vote for the 2GA. I know many people have done it already but something about mixing the trim pieces off the two models just sticks out like a sore thumb. The twisties with the 2GB styling just flows so well. Like they were meant to be there.
Thanks, its been a few years since I’ve been to the track so I guess I’ll see when this runs /returns to the track .
Sent payment for the 2ga skirts. CFH you and everyone close to me said go 2ga. I know its been done many times before but the 2ga skirts are more rare and when possible I’d like to keep my talon pride.
Shouldn’t be too bad installing them, I plan on following this write-up that was done on dsmtalk.
Just read through the whole build thread and I’ve always loved these cars. Glad to see u got back into it and making some huge progress. Keep this updated.