Lots of e85, -8 goodness coming this year 
Austin and I looked over the car pretty good today in the sunlight, and we found a bunch more weight to pull out. First of all, the car was set up with a full sized Honda battery in a legal Moroso battery box in the trunk with a cutoff switch and 4 ga. wire running from the back all the way to the front, ground and positive. I am just going to use one lightweight battery under the hood, so no need for that anymore, that should save at least 20 pounds.
Then, we looked under the carpet, and there is still sound deadening on the carpet itself, as well as the metal plate under the floor mat. Then, under the hood, there are still quite a few brackets and other random plastic items that will all be coming out.
When the car weighed in at 2380 or so, it had a scattershield and driveshaft loop. I don’t have either one of those, and at least on the stock turbo I will not be running either of them, so that is a few more pounds there.
It currently has a black Evo 9 steering wheel, which are hard to find and very popular to buy in the Evo community, so I will be selling that and getting a lightweight Sparco wheel and hub. I beleive Brian had one in the car before, so this won’t be new weight reduction, but it will be more from it is now, so that’s a plus.
The car will, however, have working headlights, which were not on the car when it was very light, so I am hoping we can offset that system with the other weight loss, to get it around 2500 pounds with me in it. That would be a good weight to rock gobs of power in :tup:
This week we should be able to get it up to the shop, and I am ABSOLUTELY planning on being ready in spring!
–mark
---------- Post added at 01:39 PM ---------- Previous post was at 01:38 PM ----------
As per R/TErnies request, here are some photos. Sorry for the quality, they are from my shitty ass iPhone:
Exterior:


Under the car:

Interior/Cage:


Trunk:

Under the hood:


Fuuuuuuuuuuuuuuck, this wire job won’t be that fun

Something is missing here

More shots once I start to make some progress, get a better camera, and clean it up a bit!
–mark
You totally had this sitting in Word on your desktop chomping at the bit for us to go live so you could post it!
:tup: for progress. Hopefully you can make the spring deadline!
The car is still going up to the shop this weekend, but while I wait, I took some pictures, this time with a good camera. Notice the Lambo orange powdercoat on the Wilwoods 8)


Fuck!
I look forward to this.
Last night we brought the car up to the shop, so today I was able to wash the car nice, start ripping it apart, and learn more about it. First, the pretty shot!


For progress, I pulled out the Taylor battery box, tie down, and the “fullsized” battery.

Then I started up front, learning how the removable front end works, and how it was all made. With 2 10mm bolts, and 4 small bolts, the bumper comes right off.


The bottom of the bumper slides into rails, and the top of the bumper is bolted to a custom “upper radiator support”, that is quick release with two pins.


The small radiator simply slips into the lower hoop, and then is held on by one mount on the upper radiator support.


The Buschur Race FMIC bolts to the hoop with 4 bolts, and is extremely secure, but easily removable.

Most of the day was spent washing the car, learning how it works, and making it my own, but it’s nice to finally have it up at the shop. The motor, transmission, transfercase, clutch, driveshaft, intake manifold, and exhaust manifold / turbo will be going on most likely this week. I want to clean up the wiring and get that all situated first, but it’s really coming along. Then, it will be fabing up an exhaust, a fuel system, and a tune, and I will be hitting the streets


Very clean
looks very nice
could u find out perhaps what suspension is on that 1g to the left of your car (right in the pictures) ?
Did some more wire-related work today. I pulled off the rear bumper so that I could remove all of the battery wiring for the rear-mounted battery. I am very impressed with AWD Motorsports (if they were the ones that did this), or whoever did the work, it was done very well. The wire was wrapped in the mesh-style wire wrap , and then heat shrink on the ends, and mounted to the chassis using insulated metal rings. Very secure, and I know this since it took me at least an hour to remove it laughs


After pulling that wiring out, I removed the electric water pump, so that we can get some order in the engine bay. I am not sure yet if I am going to run the electric pump or the stock pump, since I will be on a stock-internaled motor at first. I guess I will have to ask and see what kind of gains people are seeing. Emery told me that people see quite a bit of power at the top of the rpm range by going to the electric setup, but it’s significantly more weight.

I went through the engine harness and nothing is cut up, so dropping in the new motor should be a breeze.


–mark
IN for times…
Mark
Great build / thread
The nice thing about the electric water pump besides taking load off the engine is you can circulate water in between runs. Is the fan on a manual switch also?
I don’t know the rules are what events you will run with this car but wouldn’t you want to retain the kill switch in the rear?
Love that you have the parachute bar on deck for when the time comes!
Both the electric water pump and fan were run off of the AEM for Brian, and I will be running the stock computer at first, so I will have to figure that out still. I may do what emery did and run a switch to turn the pump on automatically, and then let the stock computer control the fan relay (that is, if I run the electric pump).
As for the kill switch, a few people have commented on that, but the truth is, it’s still a street car for me at heart, and I don’t really compete at events, so I am not concerned about keeping it in the back. I just wanted to simplify the system more and drop some more weight, and in the process of losing the big battery, the wire, the box, and the switch, it saved nearly 25 - 30 pounds.
–mark
project Anal i love it.
You would 
---------- Post added at 02:07 PM ---------- Previous post was at 02:00 PM ----------
Shawna is basically the best photographer ever, I don’t know how she got my car to look so good. Here are some pics that she posted up!


–mark
needs jdm bumper-ness!
It definitely does, Brian sold it to someone else before I bought the chassis, so I need to track down another one. It’s not a “make or break” to get it running, and it costs like $900, so it will wait a little bit
:tup:
very clean car, saw it outside stm the other day leaving school, ilism. you should have the rotors cut 
nice job mark
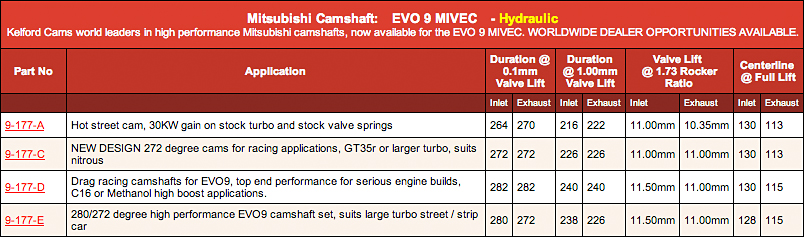
So, we are making some progress in the planning stages. First, we decided on a set of cams for the car. We are going with the Kelford 280/272 cams. I ran 272/272 on the red car and they were amazing, so I figured I would try a slightly more aggressive setup this time. Here are the specs:
Also, as history tends to repeat itself, Brian (most-wanted) contacts me yesterday and said he tracked down the fuel system out of the car when he had it. He sold it to his buddy for his tt mustang setup, and the guy ended up never doing it, so he has the entire fuel system, as it was in Lana, when Brian had it. I just picked that up for a great price.
For those of you that don’t remember, this is what it consists of:

It’s a Weldon 2035 fuel pump (baller as fuck), the proper fuel filters, fittings, a 4 gal. fuel cell (I will use for a while, and then go larger so I can drive it more than 20 miles at a time), 1:1 regulator, everything! So, I am set on fuel up to around 1800 whp or so laughs
So, now we are just waiting on the cams to arrive, and we can throw all of this together. Very exciting!!
–mark