Connector under Radio…first thing that comes to mind is Cruise. It looks like it was pre-wired but never used. Trace the wires on your schematic to verify.
Great work Mark. Glad to see you tackling wiring. People should not be afraid of this stuff.
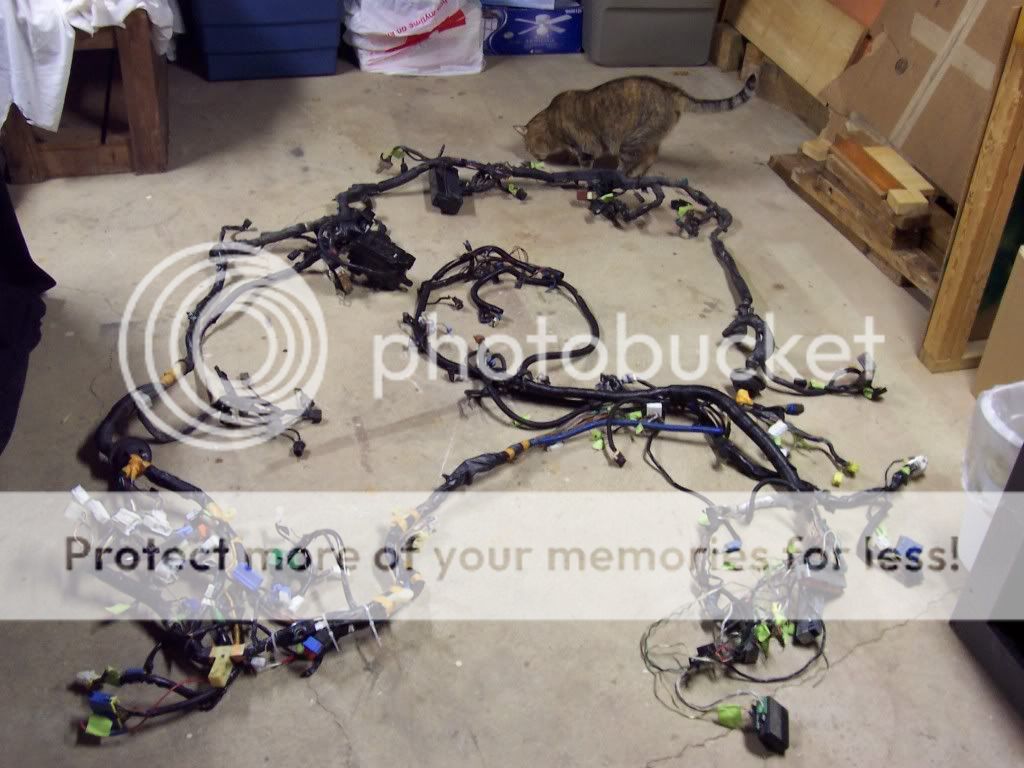
Studderin, wiring does add weight that overall can be reduced significantly. That mess above is over 30lbs for just the engine harness and engine bay. It will be cut by hopefully half with the wire tuck. The overall goal is for a clean engine bay on Drew’s RX7, not weight reduction.
You could also reduce wiring on the dash, doors (especially on a 4-door), interior, trunk, roof…etc. To make this a streetable car you won’t need much. Keep up the great work. :tup:
That is the RX7 Main Harness and the LS1 Engine Harness. All the RX7 wiring will be moved into the interior minus the Lights, Horn, Fan, and other essentials. The LS1 Harness is being redone to eliminate access wiring and to repair a horrid job by Hinson.
I am pretty sure that I am done with the front of the car, harness wise. I am now taping up the harnesses, and going to re-install them, and make sure that the car still runs, before I finalize everything and start work on the interior harness. I don’t want to bite off more than I can chew, than not know what causes a problem, if I have one down the road.
Here are a few shots of the harness as I finish it up. You can see, I am wrapping electrical tape around the wires with about a 1" spiral. This will hold the wires tight, and keep them neat and organized, but make it very easy to access them, if I need to anytime in the future. No need for loom, they will be in the car away from the elements!
Next step, is to try it all out, so keep your fingers crossed for me! If all goes well, I will have the car running again this weekend , at least temporarily.
Oh, and for future reference, the connector here is not a connector at all, but a row of wires that share the same signal. They share a line of metal that connects them all. It’s called a bus I think, but either way, I am keeping it there!
Not too much progress the past few days, but I did get a chance to weigh the wire and looming that was removed so far. This does not include the extra relays, plastic pieces, metal brackets, tranny ecu, or anything else I have removed in this process, this is JUST the wire and looming:
On my scale, this weighs in just shy of 6 pounds. Not bad for the wire from the firewall forward
I started re-installing the harness into the car today, so that I could test out the length of the wires, and test the fitment of the fuse block and battery under the dash. I think this has a lot of promise! Most of the harness is inside the car, just laying on the floor for now, but some of it goes out of the firewall. Here are some shots:
Again, this is just testing the length of the wire, and not everything is loomed yet, but this is showing great promise. The only wires coming out from inside of the car are through this one hole on the firewall. I am pretty sure the only wire that I need to extend is the large gauge starter wire, which needs to be extended by about 8" or so.
This picture shows the engine bay, with ALL of the wires and relays run, and as you can see, the drivers side of the bay is very very clean looking!
I do have some questions though, first, this brown 2 wire connector is just inches from the alternator plug. Does anyone know what it is for?
Next, there is a single wire that goes down behind the alternator, and I think to the oil temperature sending unit. Can someone confirm this?
If that is just for the oil temp sending unit for the stock RS gauges, it is coming out, but I want to confirm that before I definitely get rid of it.
Kicked on the heater out in the garage this morning, and started going at it again. I hooked up all of the wiring harness to the sensors, just to test everything, and make sure I didn’t miss anything in the simplification process:
As you can see in this next picture, the harness is stretched pretty tightly to the original firewall opening. I think I am going to go to the opening in the middle, instead of the opening to the left, where the wire are currently going through. This will give me a more direct run, and will prevent me from needing to extend that one wire, which I thought I had to.
Lastly, after hooking up all of the wires, I found 2 more connectors which I think I can get rid of. I am not sure what they are for yet, so I need to verify, but I think one is the o2 sensor, and one may be a fuel pressure sensor, or something for emissions. Here are some shots of those connectors:
The harness is coming out one last time, doing the final tests, and then I should be able to put it in for good, and button everything up under the hood!
progress looks good. if it were me i would use mesh wire loom and heat shrink, turns out much cleaner and better looking then the corregated plastic and tape. i remember when i did this on my truck, i said the hell with it and bought a universal kit and rewired the entire truck. went from probably around 40 lbs in wiring down to about 10. maybe using like 6 circuits? lol
So, FINALLY grew a pair and went out to work in the garage again. I removed those last two plugs I was questioning (front O2 and evap solenoid), and then put the harness in for the last time. This pic shows how I ran the wires through the firewall:
Then, I started installing the intake manifold, and connecting everything. This was difficult for me, because I have never done an intake manifold on an Evo before, but I got it after about an hour off fiddling, and reaching under for bolts and connectors. Here it is with the manifold on, and most of the wires connected:
Then, I made it this far, so I might as well install the throttlebody, and the rest of the charge pipe, and see what it actually looks like, and… its bad ass!! There is nothing left in the engine bay!! It is just an engine and tranny floating in the middle, with no fuse block or battery under the hood. I absolutely love this