Are you keeping a log of hours spent on this project? I think it would be pretty cool when this is all done to see the grand total, then multiply it by the average shop rate.
“This is my wife’s $650k VW Rabbit.”
Are you keeping a log of hours spent on this project? I think it would be pretty cool when this is all done to see the grand total, then multiply it by the average shop rate.
“This is my wife’s $650k VW Rabbit.”
Absolutely not. Hell, I dont even have an exact price list of all the parts. On purpose.
Dan
lol, understood.
*the only ‘real’ thread left on NYS. love it.
Decided not to slicksand the hood since it was so good. Just did two coats of epoxy and two coats of 2k last night.

The epoxy sprayed out really nice last night.


And then I thought I should hang a door to see how it looks. Luckily the gaps, while huge, are at least very straight.


Dan
Looking really good!
Im getting really stoked. 
Parts have been rolling in and Ive been pulling some out of long term storage.
Random motor parts

Wavetrac LSD, Autotech Ti retainers and HD springs


16v stock lifters vs 1.8T OE lifters

And the stock vs Ti retainers

Just these two are good for about 1.2lbs off the valvetrain weight (not bad).
Dan
Set the hood in place.

The SPi clear showed up yesterday and I scored a couple ounces of the Slate Grey in two different paint lines to test. Which I did last night.
Both are BASF - One Limco which is urethane based and one Diamont which is polyester based. Right now Im leaning towards the Diamont. I need sun to make my final decision, so maybe monday? (also, its impossible to take a good pic of)
Im very impressed with the clear, esp for how cheap it is. This is my first time ever spraying any clear and I feel like its a pretty good finish with a normal activator right off the gun.


Dan
Apparently it was “prep everything” weekend. I spent at least 10 hours sat and sunday on the following:
Friday I dropped the pulleys and bumper brackets off for powder coat. Of course I couldnt powder the crank pulley so I cleaned it up and primed / painted it.


And VHT texture painted the pass motor mount to match the other PC mounts.

Spent countless hours stripping the inside of the hood.

Smoothed out the mold / text on the water pump, and did a quick 2 min port job of the crap casting


Cleaned up the inside welds on the TB, re-decked the flange and got the last few things smoothed. Just needs bead blasting


Slave cylider was up next. First thing was to fix the very crooked flange. Typically these use a flare fitting so it doesnt matter but I wanted to use a banjo. I managed to get it filed and sanded near perfect. Nothing a good Dowty washer wont seal.


The smoothed out the casting quick, and primed it.(not shown)


Then it was the intake manifolds turn. Again had to clean up the inside weld for the TB (dynafile made quick work of this - it took under 15 mins even doing a final hand sanding, finish sanding out the runners, deck the flanges, etc. Again, ready for prime / paint.


And then in intercooler.
First I had to sand out the cast finish in the inlet elbow - yes this would have been way easier to do it first…


Also had to port the inlet of the IC. I used the shop vac set to blow to keep all the chips out of the core. It worked great.


The last thing it needed was the large flat surface blocked out. Im painting this and the finish was just awful. I managed to hand block it all out but the one small ding


A quick casting line removal on the starter.


And a quick sand of the IC tanks / brackets / top plate


And with that I think that everything is metal finished in prep for prime / paint.
Also got some more googies in friday, and have everything laid out garage sale style, and all the APR hardware sorted into baggies per location needed.


And finally, I got a good shot of the paint in the sun. Its very hard to photograph, but I decided to go with the lower one (polyester based) which has way more flop and depth to it. The top one just sorta always looks dark.

Picking up the motor tomorrow.
Dan
Picking up the motor tomorrow?! Awesome progress, too.
What’s the deal with the motor, what sort of work did ‘they’ do, and what will you be doing?
nothing special. Bore / hone / deck / hot tank
The head just a valve job using the stock valves and a deck .
Ill be reassembling the lower end with the help of my tuner, who also assembles engines.
Head assembly is pretty easy, so Ill do that myself, or maybe have my daughter help me install all the stupid keepers.
dan
I also decided on the paint, and should have that this week. Im hoping for some pretty epic progress the next month or so.
Epoxy primed and slate grey raptor’d the underside of the hood last night.
The underside was pretty rough and I didnt feel like doing body work on it, so the raptor was a good compromise. Plus it matches the rest of the under hood theme.


Dan
Now all i’ll think about when I look at this car is the shoddy lack of attn on the hoods underside. Disappointing.
Picked up the motor bits from the machine shop yesterday. Very pleased at how it turned out.


Finally sourced an M14x1.5 temp sensor from a mid 90s BMW and the shop plugged the stripped oe temp sensor location.

Then I got the block all masked for paint which was a lot easier than I thought. I used a fine file to trim the tape on any edges, and then cut the tape by hand around a few parts that I had to trace (breather box, oil filter mount, front main seal etc)


I may expose a bit more block on the trans end here, need to figure that out still.

Dan
Got the head masked yesterday afternoon since I was tired of washing wheels and whatever.


Also decided I wanted to try and expose more of the block under the trans, to hopefully keep rust to a minimum. Made a paper tracing of the bellhousing and used it as a guide. Also had to trace out the rear main seal flange.

Dan
Finally got paint last night, and put it to use.
Got the block, head, intake mani, intercooler, charge pipe, and valve cover painted.
Im super happy with how the SPI clear laid out using my relatively cheap Finishline FLG4 gun.
Safety first !

mmm

color down


And everything cleared and unmasked.


Thats prob going to be it for a week or two.
Dan
Grabbed some pics of the paint outside yesterday. very happy with how it turned out.


Dan
Mocked up a few parts for fun last night.


Dan
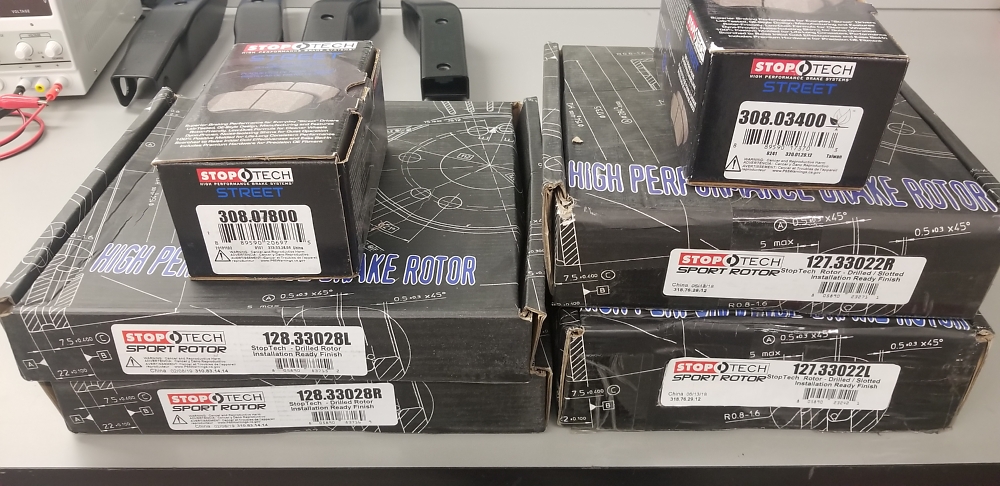
Not a ton of progress lately, Ive been busy with other stuff now that its finally spring (mowing, etc).
I found a good deal on pads/rotors
And got the head assembled
Got creative with the spring compressor to free up both hands. It worked well.
Autotech HD springs and Ti retainers installed
And then the 1.8T lifters and stock cams with a new Iwis chain
Swapped a couple of the inner cam cap studs with the two external ones that were slightly rusty. And scored some 12pt 7mm ARP nuts for them. Also installed the cup for the USRT trigger setup.
Finally masked off a bunch of smalls for the engine that need painting.
Dan